The identity provider (IdP) handles authentication for the Tenzir Platform. When you click the Login button in the Tenzir UI, the system redirects you to your chosen identity provider, which creates a signed token that certifies your identity.
You can either use an external identity provider that’s already set up inside
your organization, or run an identity provider that’s bundled with our
example docker-compose.yaml.
The Tenzir Platform supports the OpenID Connect (OIDC) protocol for external identity providers. Below, we describe the requirements for using a generic identity provider, as well as two hands-on guides for setting up Keycloak and Entra ID as identity providers for the Tenzir Platform.
Generic Identity Provider
Section titled “Generic Identity Provider”To use an external IdP, ensure that it supports the OIDC protocol, including the OIDC Discovery extension, and configure it to provide valid RS256 ID tokens.
Set up the external identity provider by creating two clients (also called
applications in Auth0, or app registrations in Microsoft Entra) named
tenzir-app and tenzir-cli.
The tenzir-app client handles logging into the Tenzir Platform in the web
browser.
- You must enable the Authorization Code flow.
- The allowed redirect URLs must include
https://app.platform.example/login/oauth/callback. - You should note down the client secret so you can add it to the configuration of the Tenzir Platform in the next step.
The tenzir-cli client handles authentication with the tenzir-platform CLI.
- You must enable the Device Code flow.
- The identity provider must either return an
id_tokenfor the device code flow, or anaccess_tokenin JWT format.
You may want to run CLI commands in environments where no user is available to perform the device code authorization flow, for example when you run CLI commands as part of a CI job.
In this case, you can set up another client with the Client Credentials flow
enabled. The access_token you obtain from this client must be in JWT format. The
CLI automatically attempts to use the client credentials flow if
the TENZIR_PLATFORM_CLI_CLIENT_SECRET environment variable is set. You can
also force the use of the client credentials flow by using the
tenzir-platform auth login --non-interactive option.
You must provide the following environment variables for the OIDC provider configuration used for logging into the platform:
TENZIR_PLATFORM_OIDC_PROVIDER_NAME=example-idpTENZIR_PLATFORM_OIDC_PROVIDER_ISSUER_URL=https://my.idp.example
TENZIR_PLATFORM_OIDC_CLI_CLIENT_ID=tenzir-cli
TENZIR_PLATFORM_OIDC_APP_CLIENT_ID=tenzir-appTENZIR_PLATFORM_OIDC_APP_CLIENT_SECRET=xxxxxxxxxxxxxxxxxxxxxxxx
You must provide the following environment variable containing a JSON object with the OIDC issuer and audiences that the platform should accept. You can also provide an array of objects to configure multiple trusted issuers.
# Single issuer configurationTENZIR_PLATFORM_OIDC_TRUSTED_AUDIENCES='{"issuer": "http://platform.local:3004/realms/master","audiences": ["tenzir-app"]}'
# Multiple issuers configurationTENZIR_PLATFORM_OIDC_TRUSTED_AUDIENCES='[  {"issuer": "https://accounts.google.com", "audiences": ["audience1"]},  {"issuer": "http://platform.local:3004/realms/master", "audiences": ["tenzir-app"]}]'
Keycloak
Section titled “Keycloak”This section explains how to configure Keycloak as an external Identity Provider for use with the Tenzir Platform.
We assume that you already have a Keycloak instance up and running that you can reach with a browser. We provide an example stack of the Tenzir Platform with a bundled Keycloak instance here. The remainder of this section assumes you’re running this example stack, but the setup is the same for any other Keycloak instance.
Setting up the Keycloak Instance
Section titled “Setting up the Keycloak Instance”Admin Login
Section titled “Admin Login”Navigate to the Keycloak instance and log in as a user with admin permissions.
If you use the bundled Keycloak instance, the initial username is admin
and password is changeme.
Remember to change the default password after logging in for the first time, and to set up 2-factor authentication for your admin user.
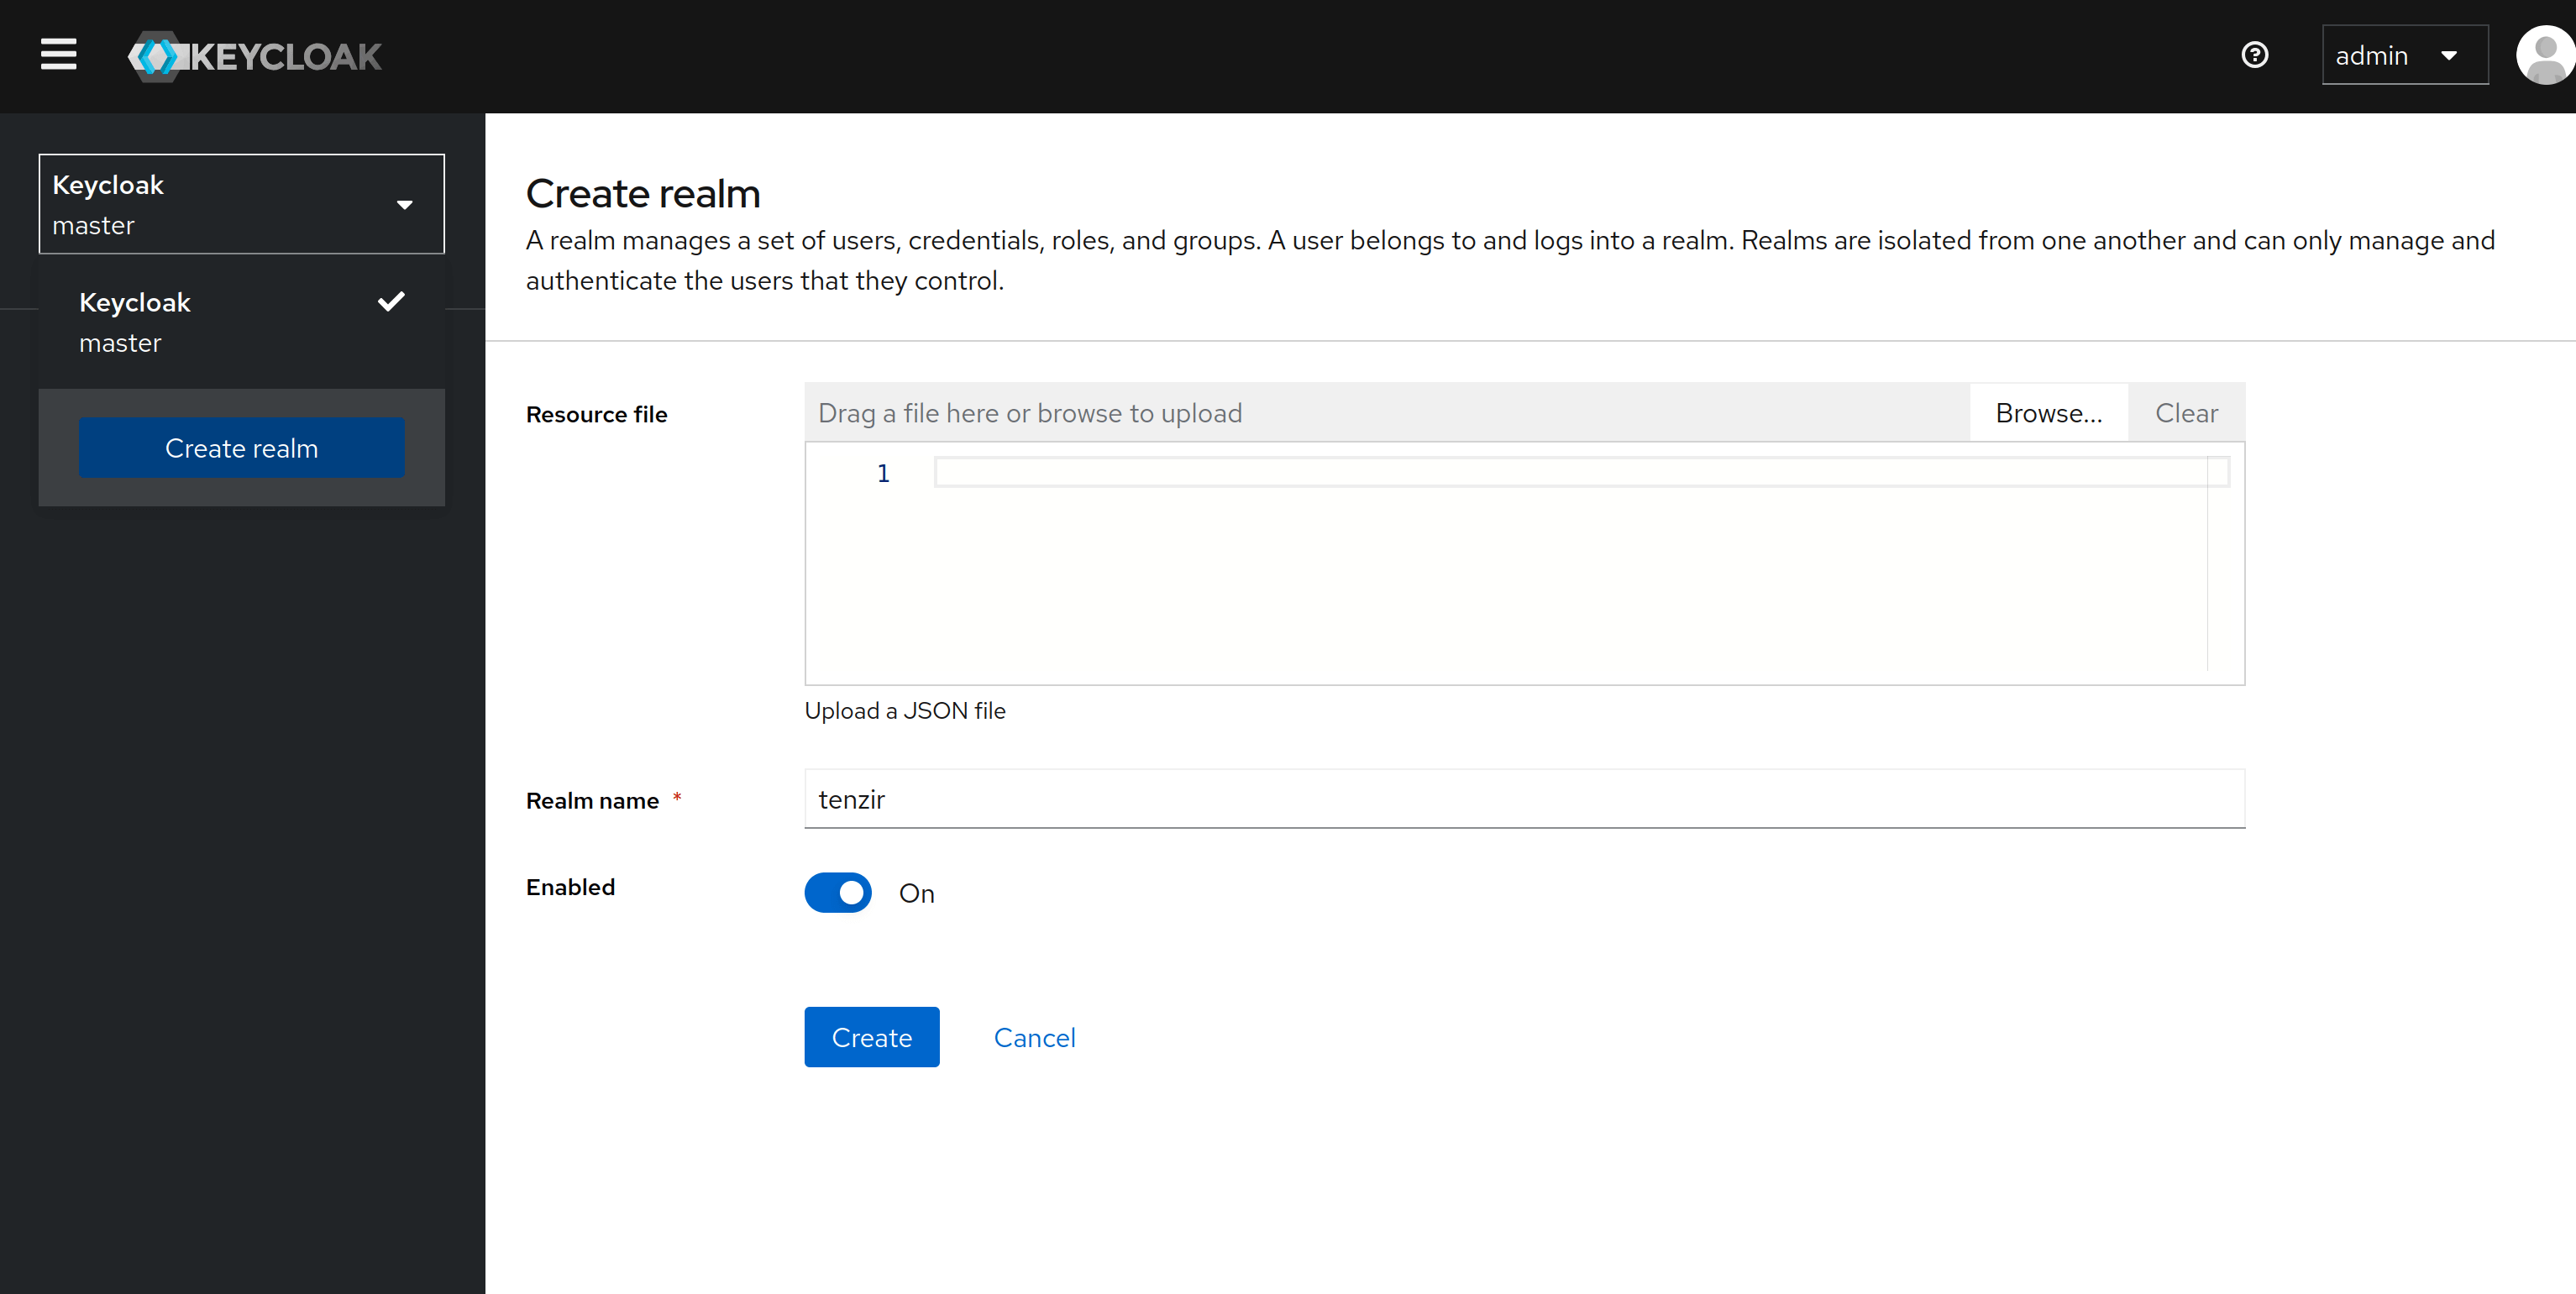
Create a new tenzir realm (optional)
Section titled “Create a new tenzir realm (optional)”Keycloak defaults to the master realm and the bundled Docker Compose
stack uses this realm by default.
If you want to use a different realm, or if you already have an existing one,
update the TENZIR_PLATFORM_OIDC_ISSUER_URL variable to point to the
new realm instead.
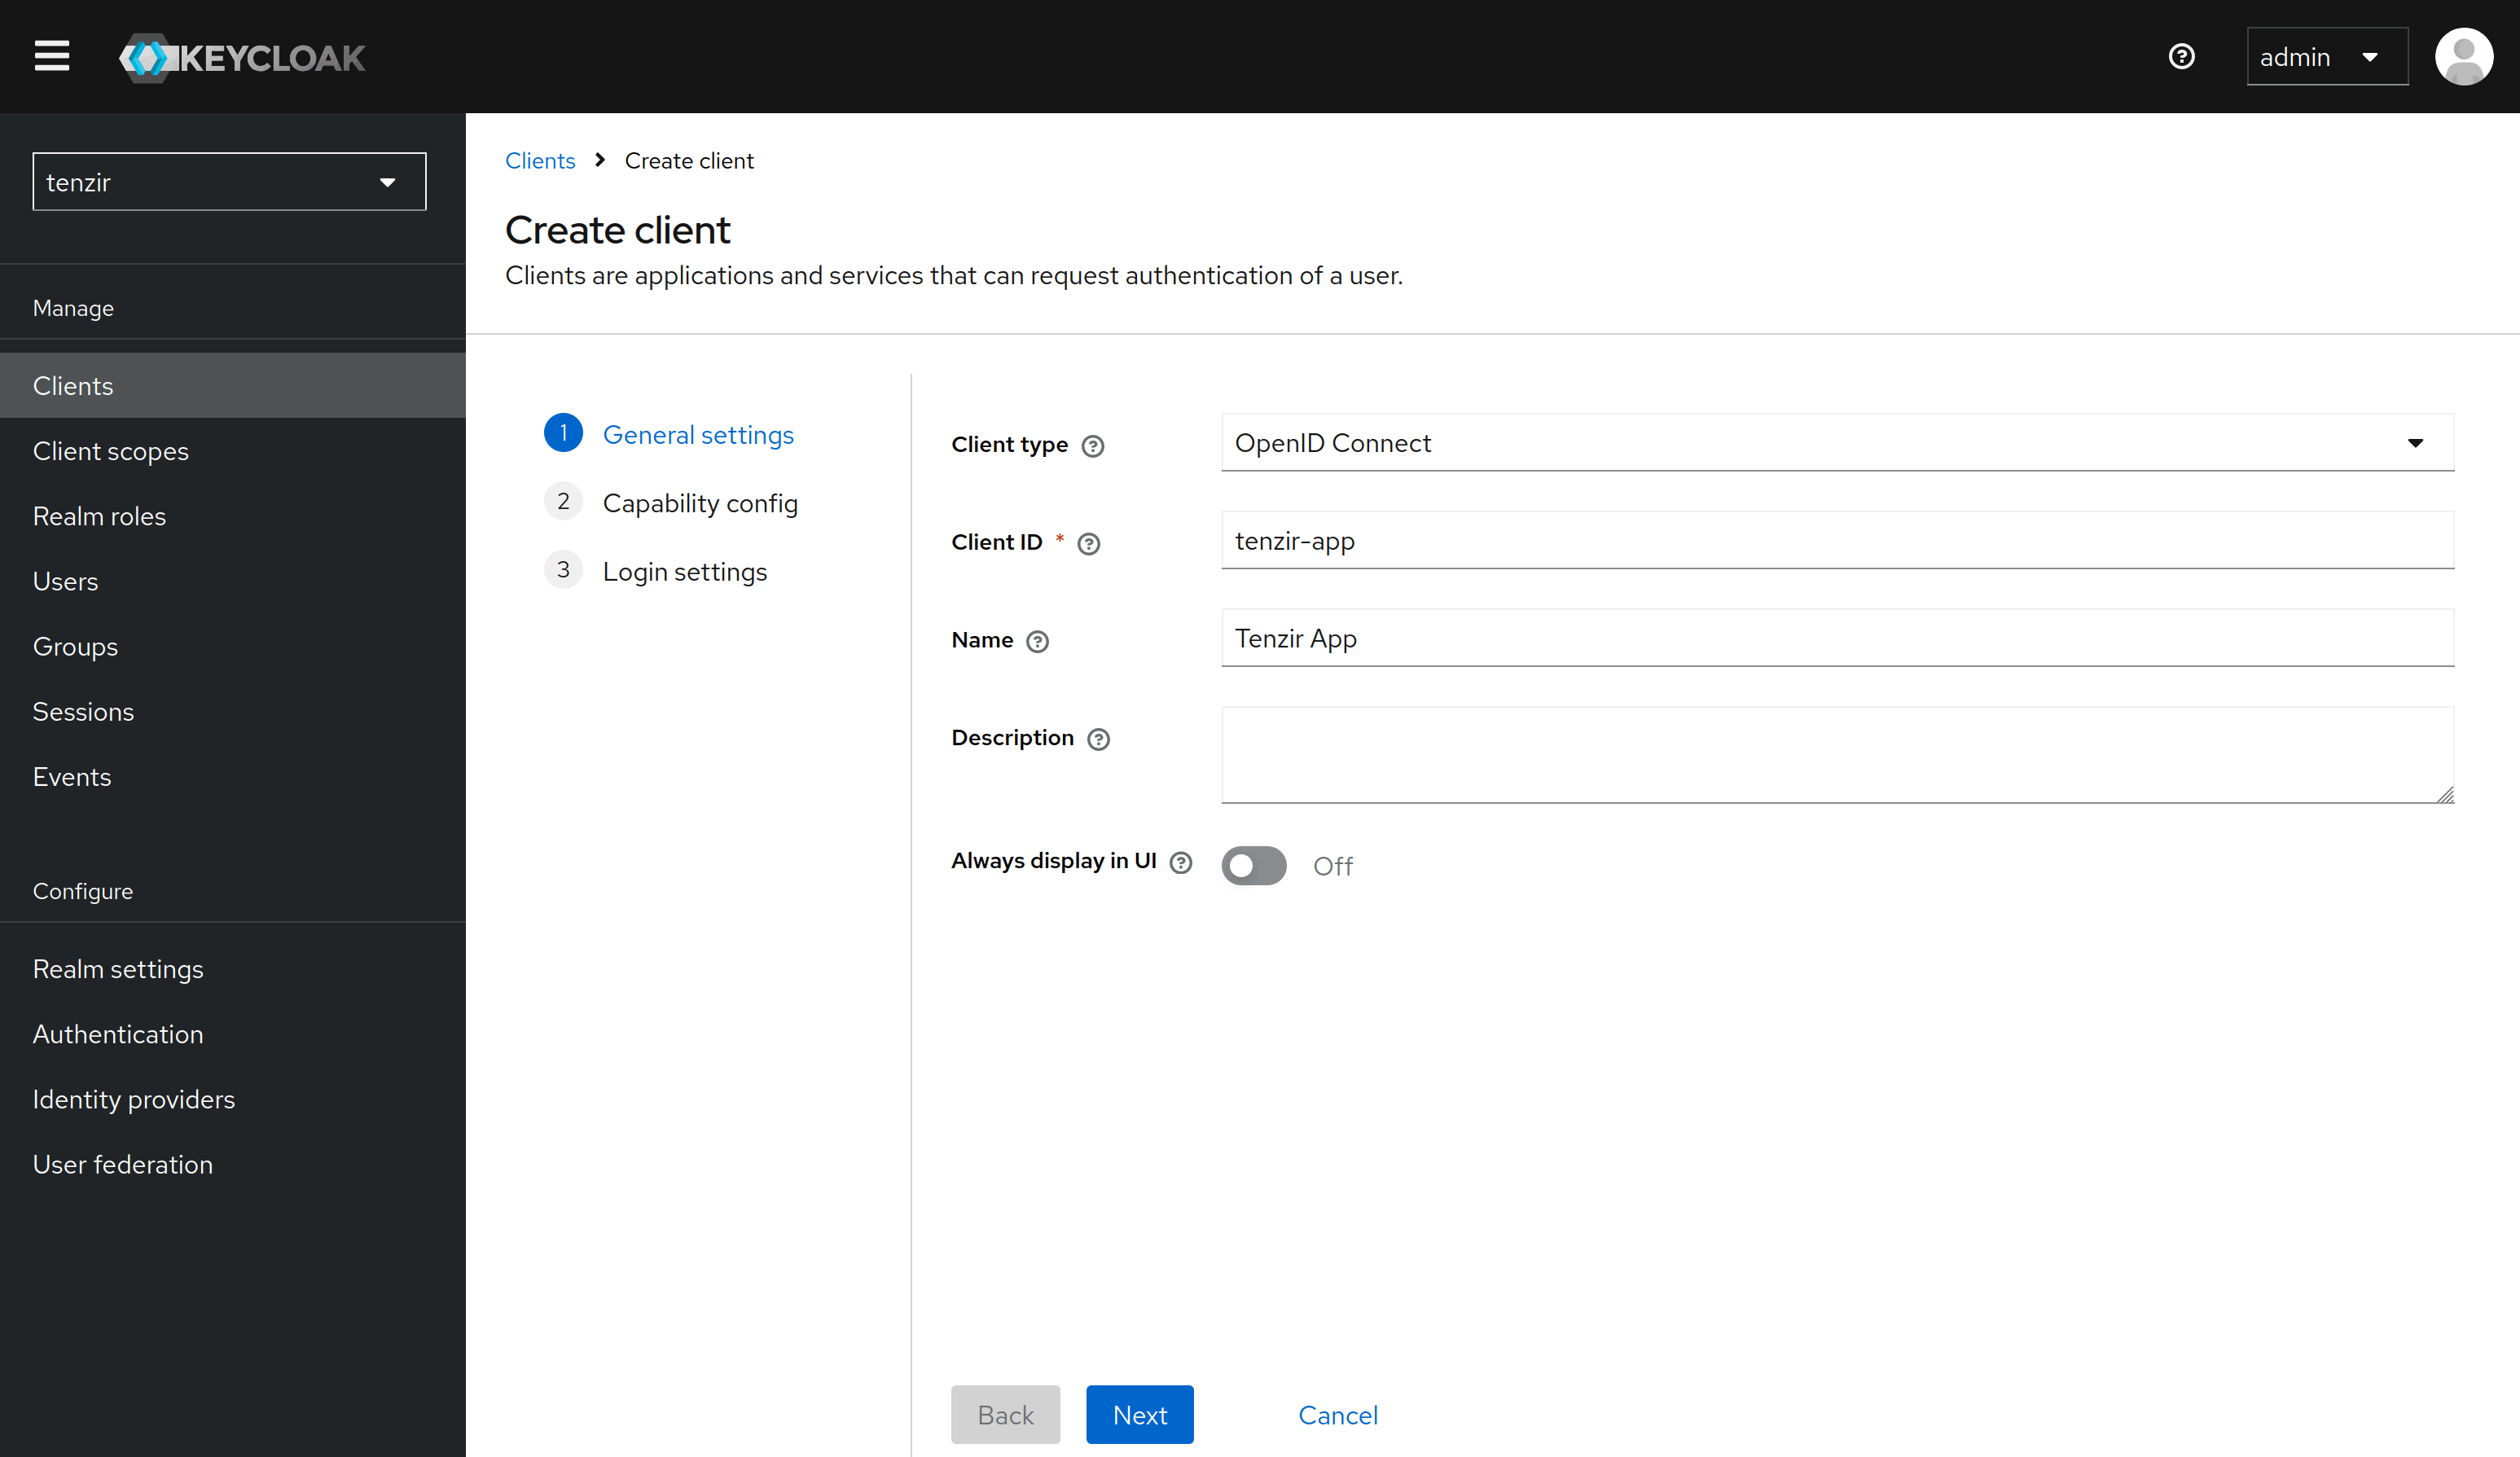
Create a client for the app
Section titled “Create a client for the app”Use the Add Client button in the Clients menu on the left. Configure the new
client as follows:
Under General settings, set the client type to OpenID Connect and the
client ID to tenzir-app. If you use a different client ID,
remember to update the TENZIR_PLATFORM_OIDC_PROVIDER_CLIENT_ID variable
in your Tenzir Platform configuration accordingly.
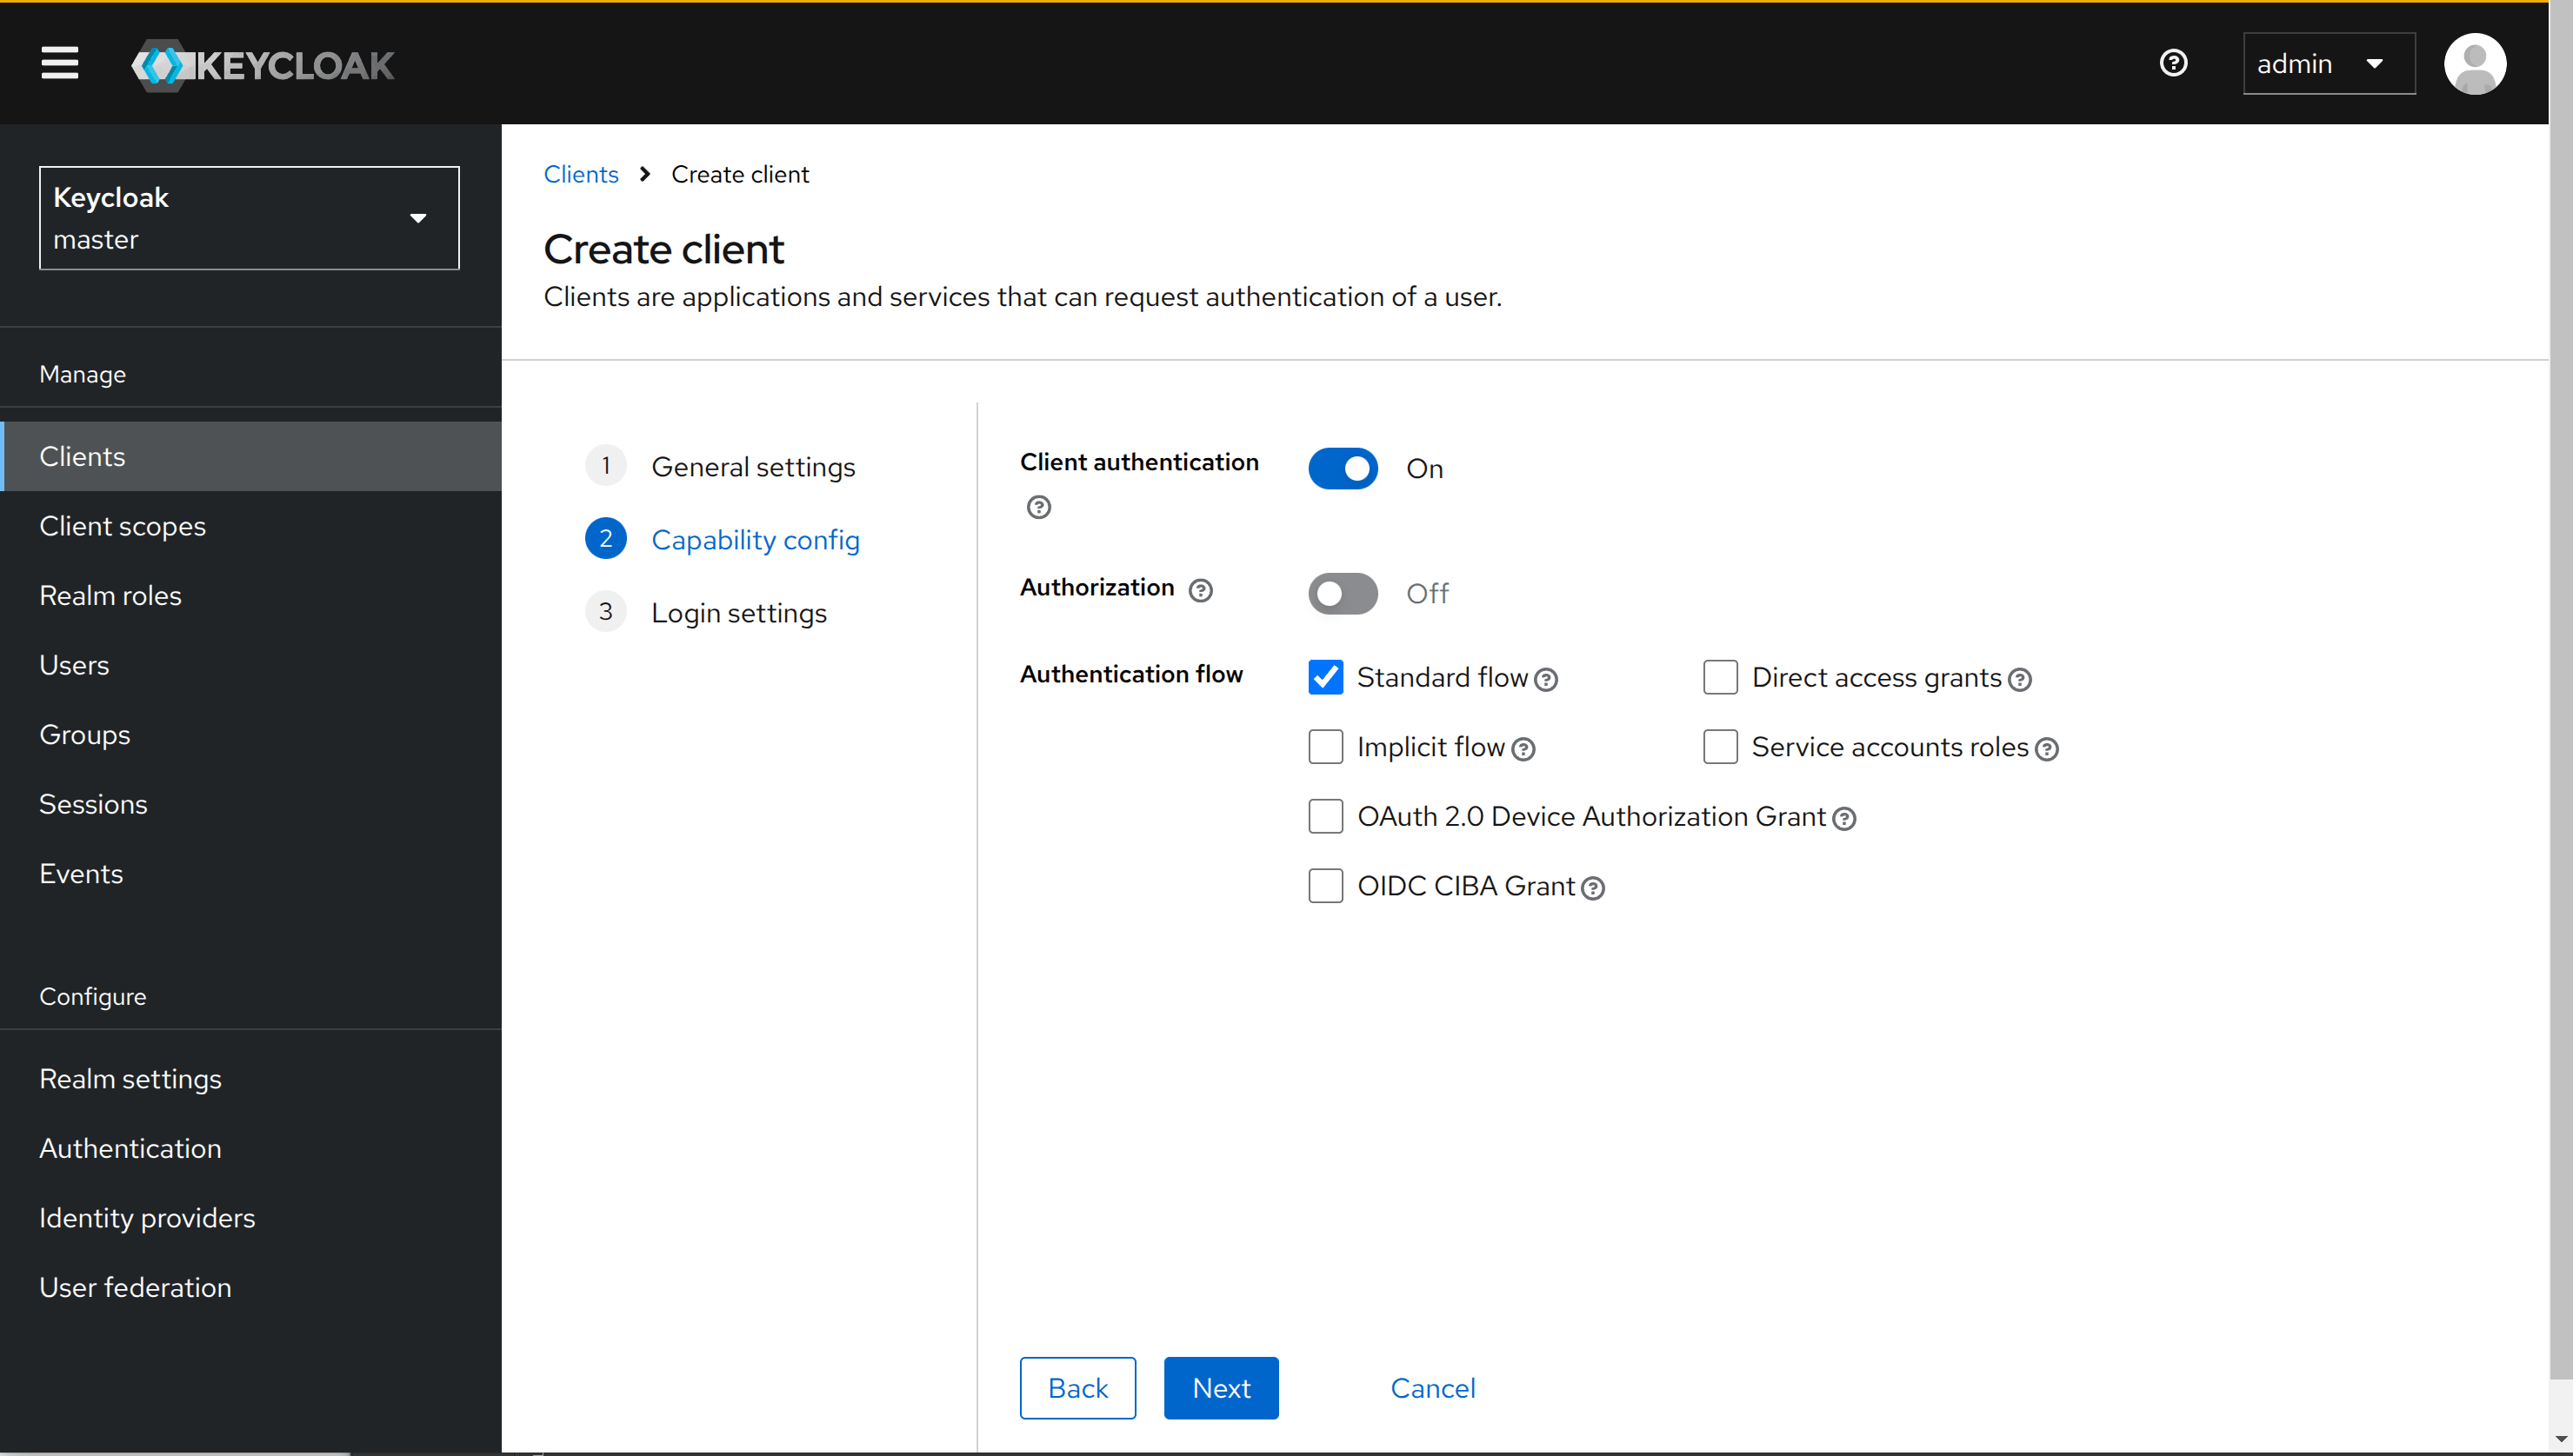
Under Capability config, enable client authentication and the Standard flow access method.
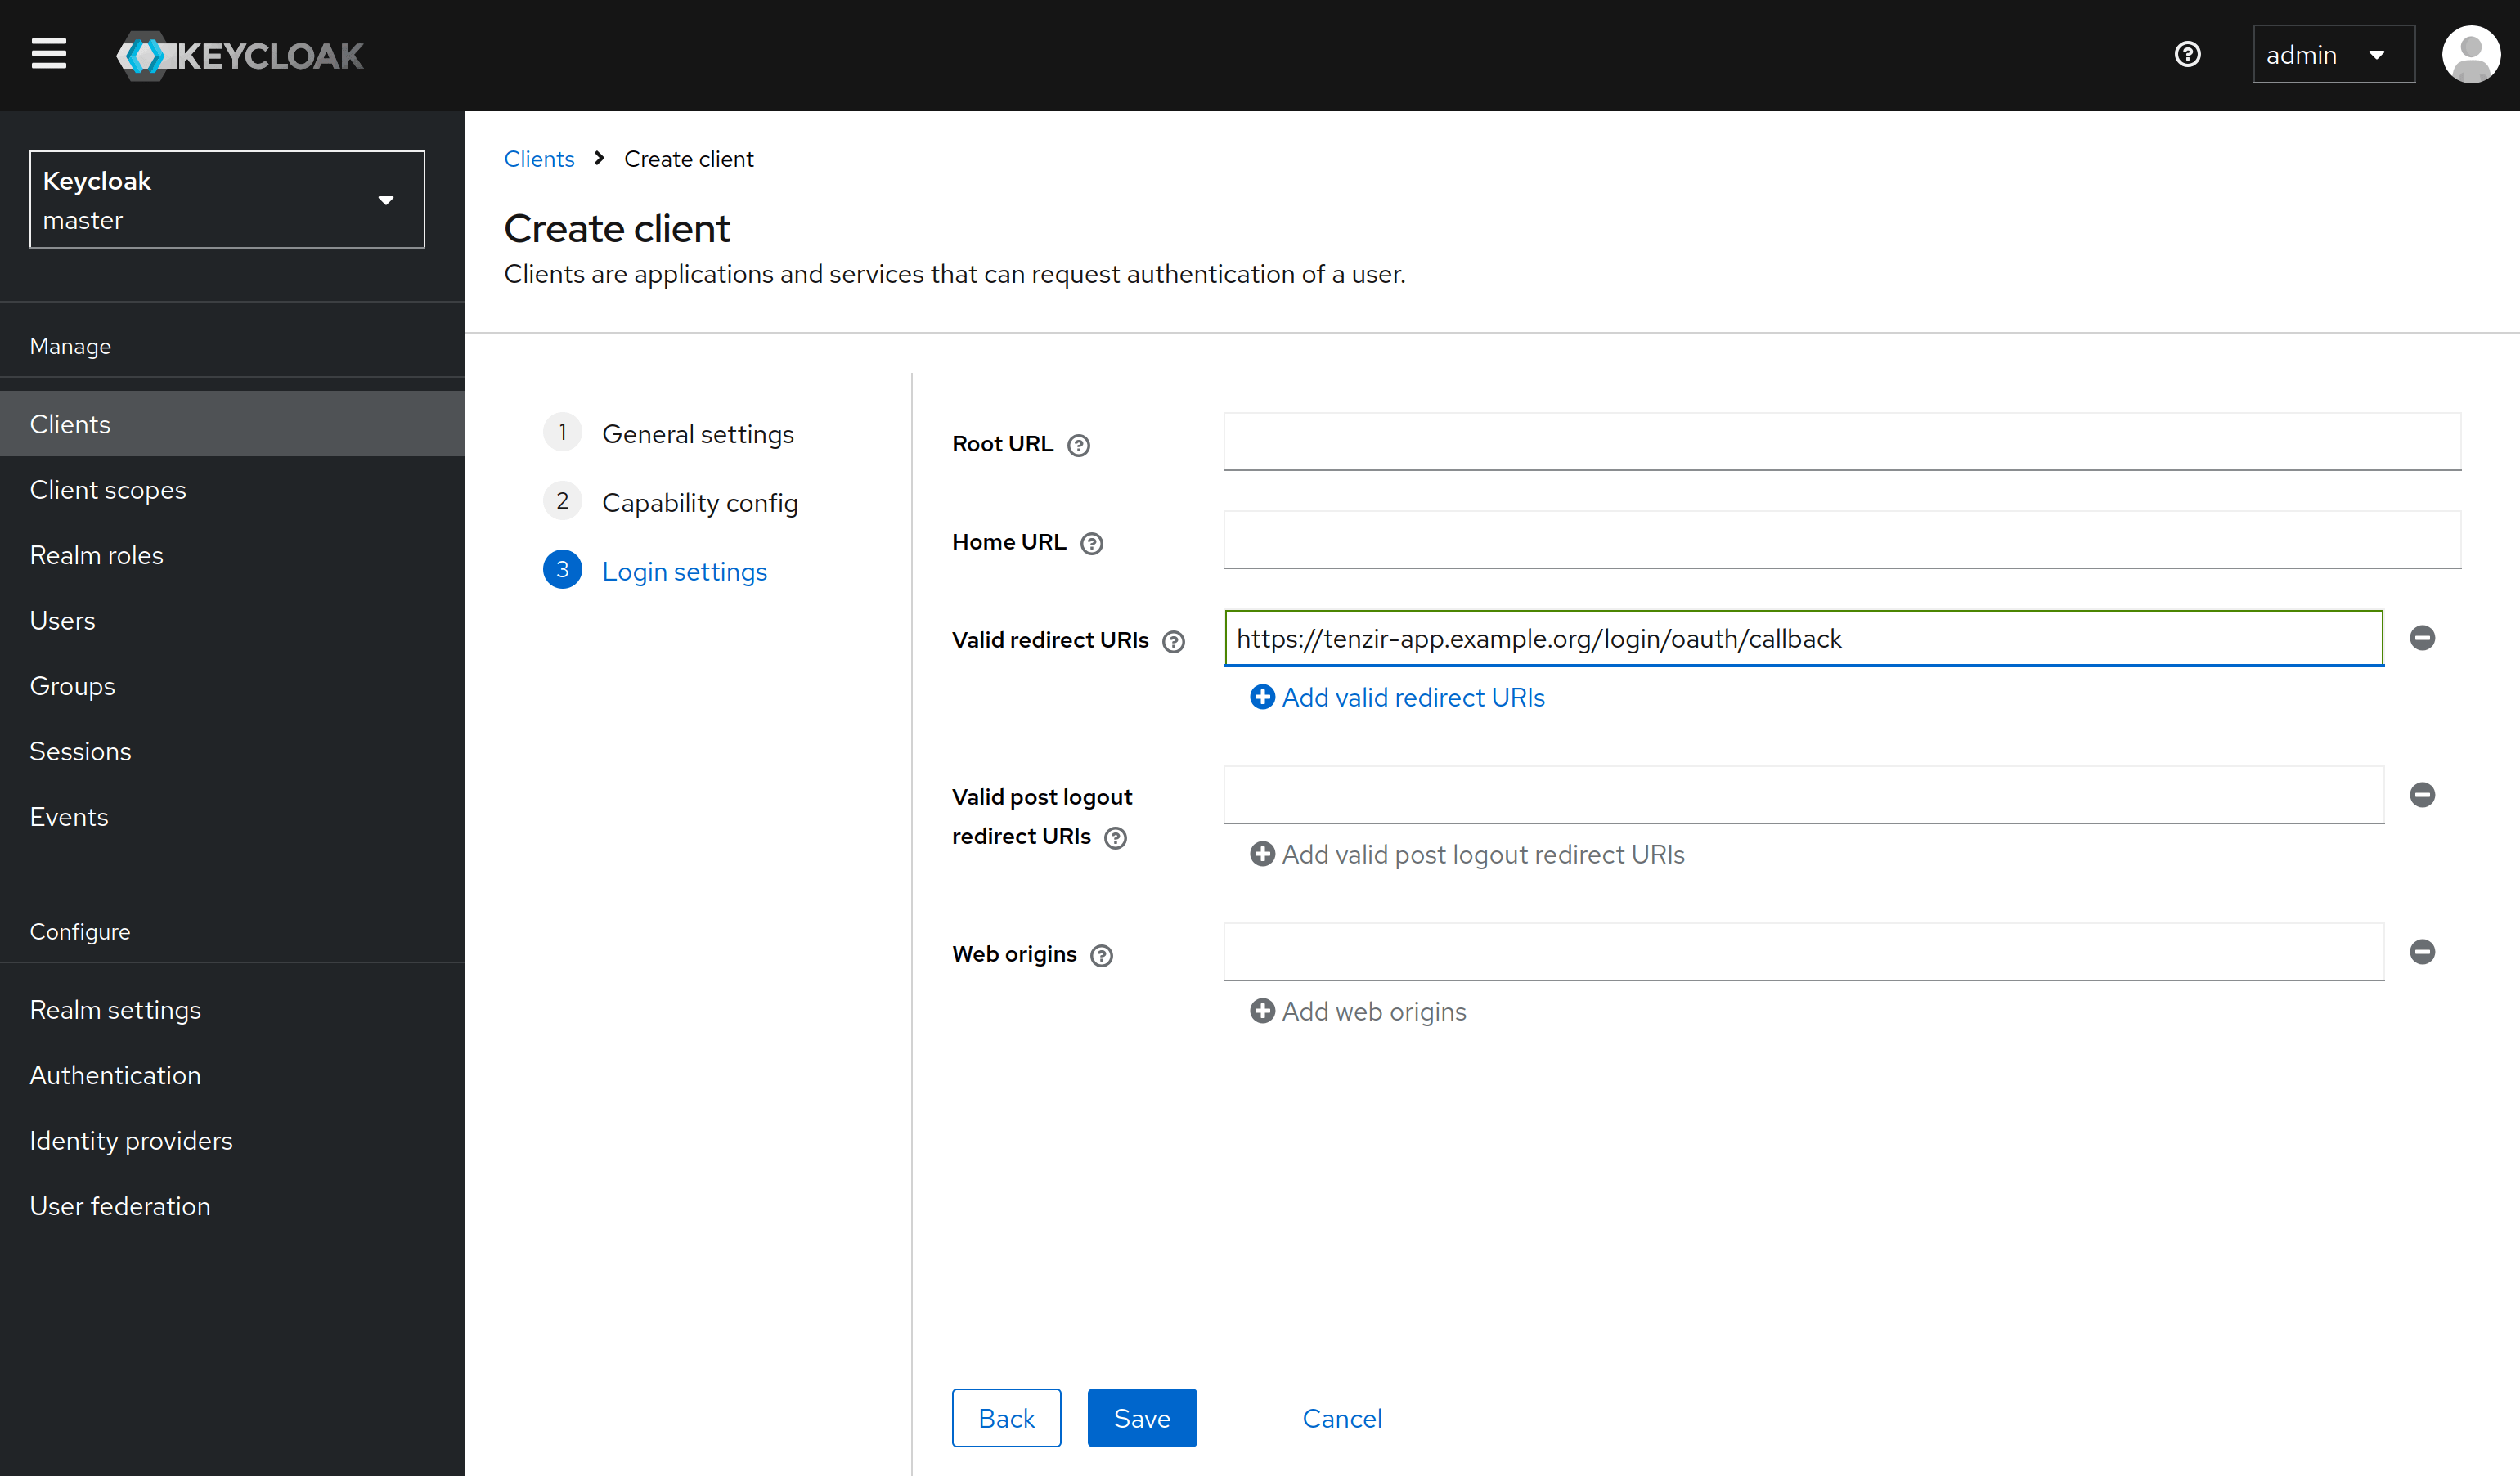
Under Login settings, enter a redirect URL that points to ${TENZIR_PLATFORM_DOMAIN}/login/oauth/callback,
where TENZIR_PLATFORM_DOMAIN is the domain you configure in your Tenzir Platform configuration.
For example, if the app runs under https://tenzir-app.example.org then this should be
https://tenzir-app.example.org/login/oauth/callback.
Finally, in the client view, go to the Credentials tab and copy the value of
the generated client secret. You must add this to the Tenzir Platform configuration
under TENZIR_PLATFORM_OIDC_PROVIDER_CLIENT_SECRET.

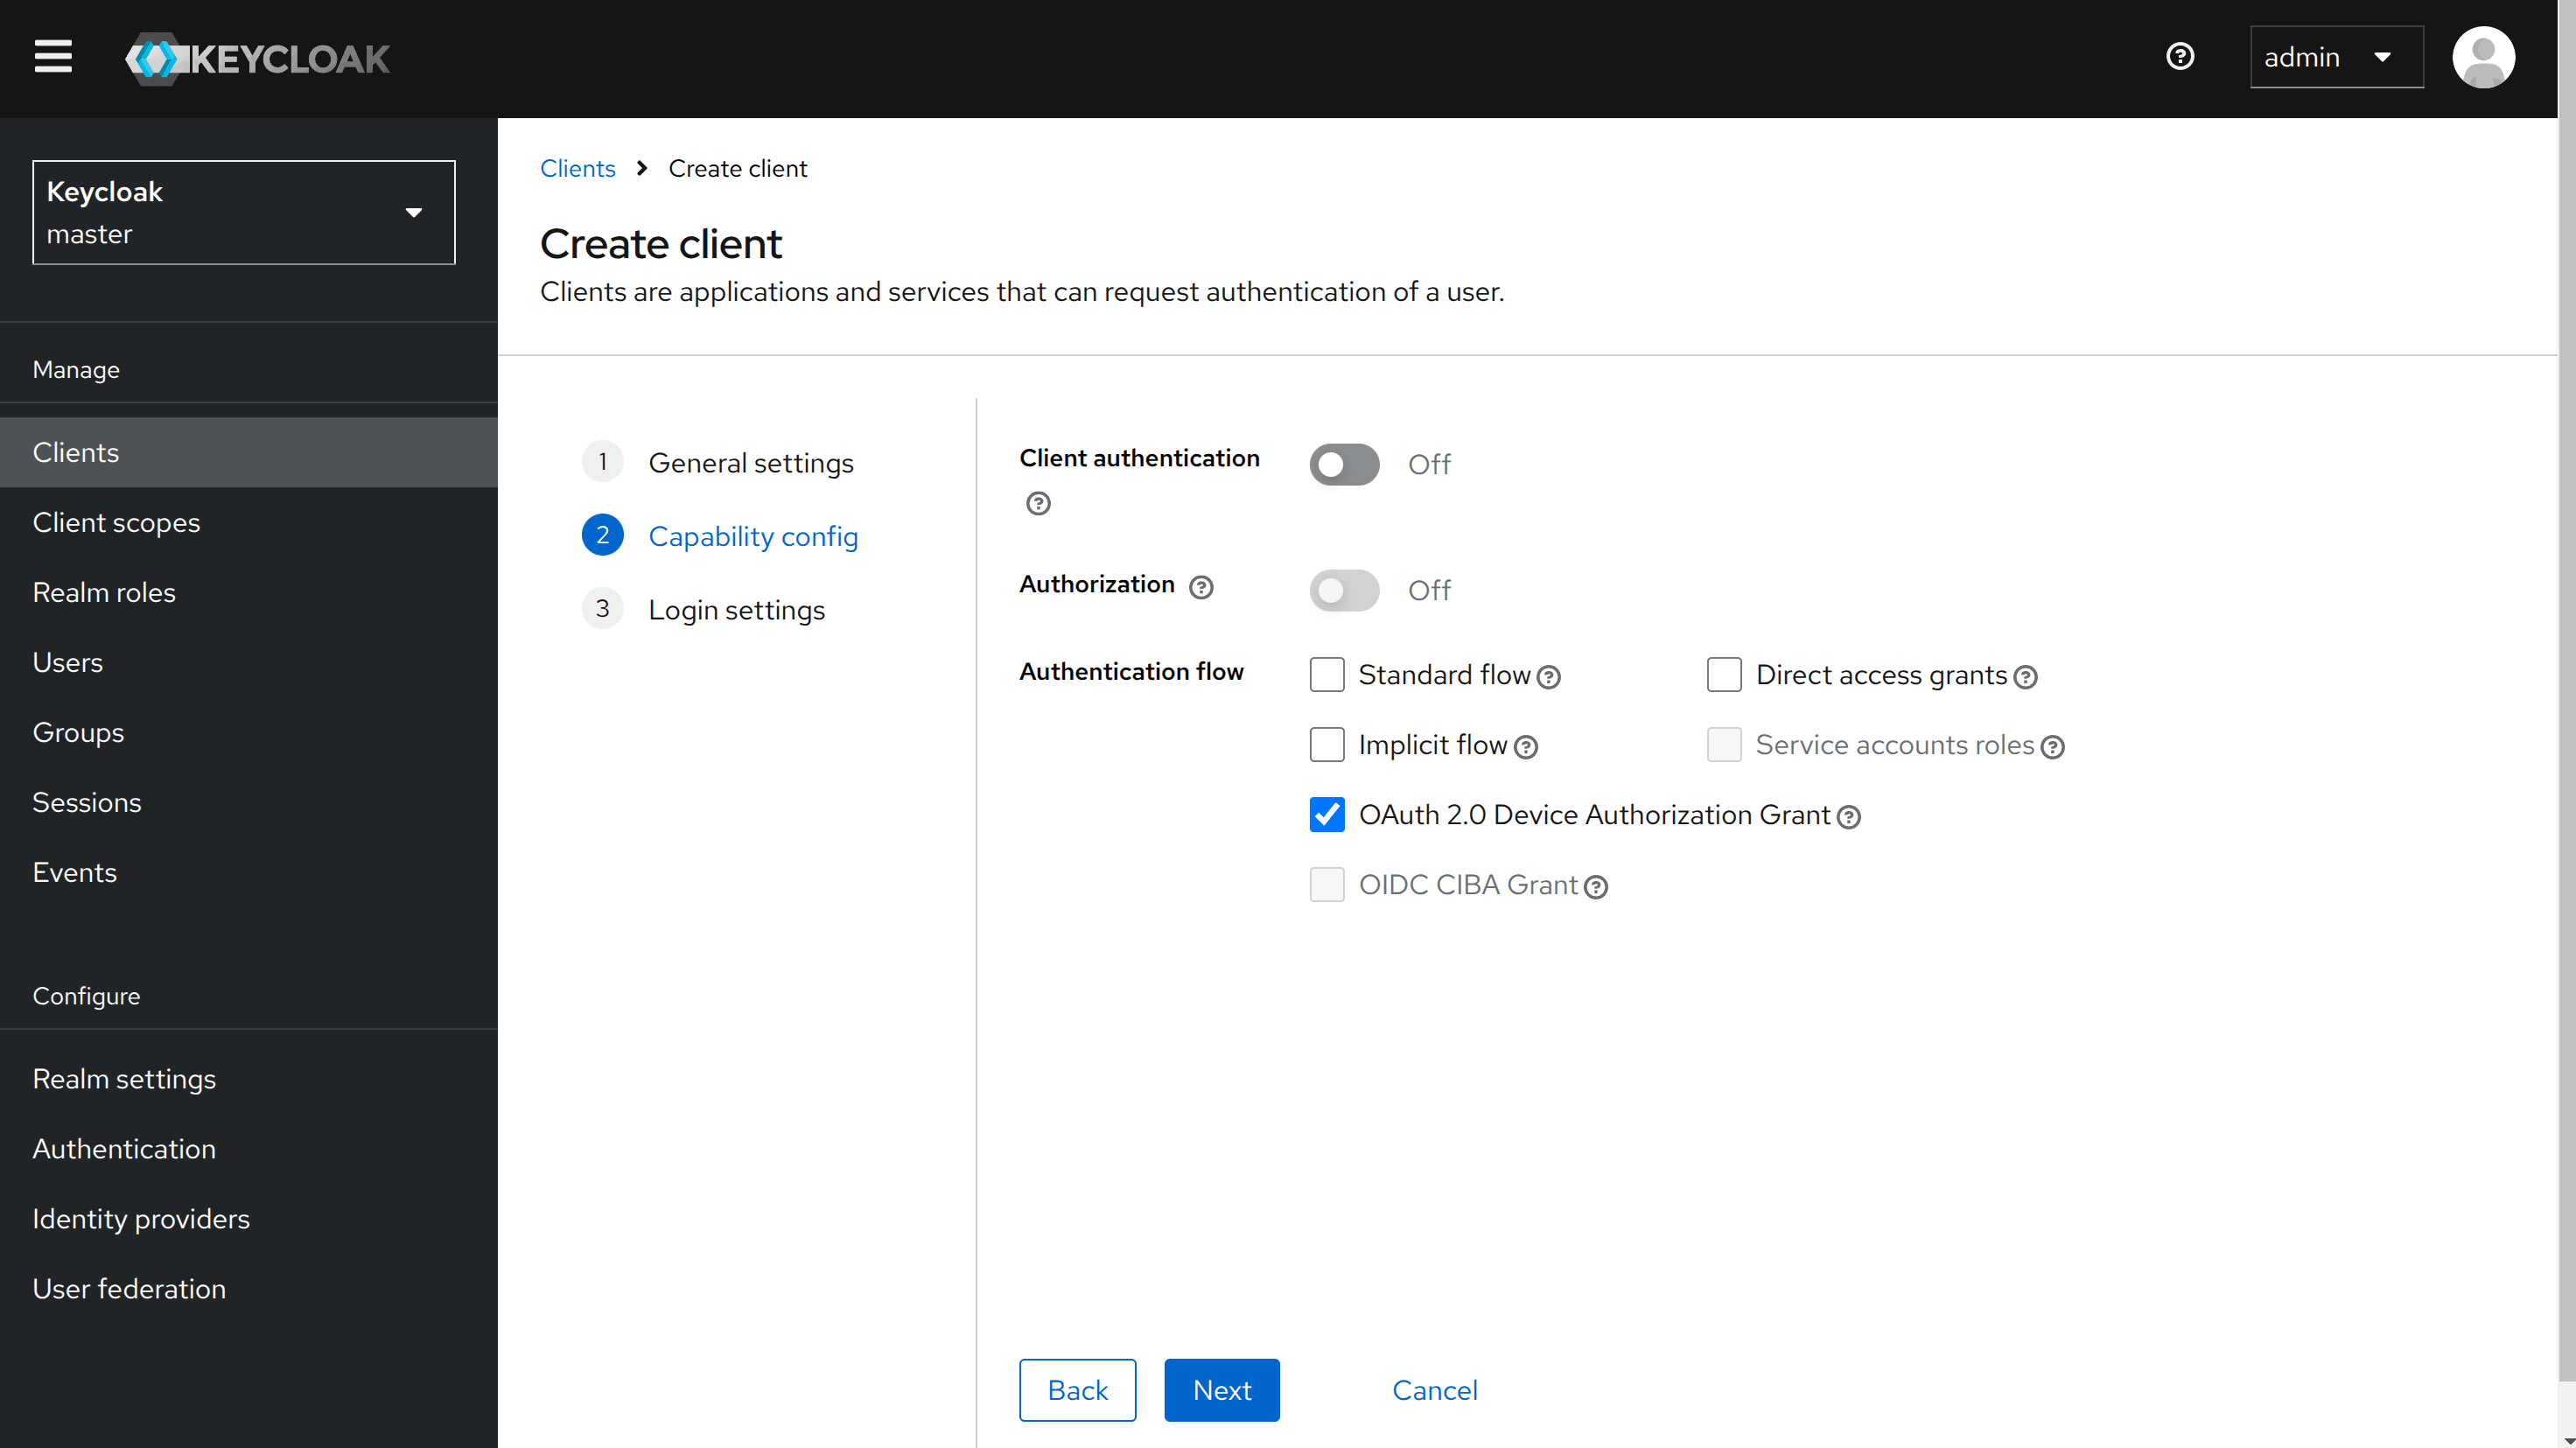
Create a client for the CLI
Section titled “Create a client for the CLI”To use the tenzir-platform CLI, you need to set up an additional
client that supports device code authentication. (It’s possible but not
recommended to use the same client for both the Tenzir UI and Tenzir Platform CLI)
To do this, proceed exactly as above, but use tenzir-cli as
the client ID and under Capability config disable the Client authentication
setting and enable the OAuth 2.0 Device Authorization Grant authentication flow.
Microsoft Entra Identity
Section titled “Microsoft Entra Identity”To use Microsoft Entra Identity as an OIDC provider, you need to create two app registrations in Entra ID and configure them for use with the Tenzir UI and the Tenzir Platform CLI.
Follow these steps to create the required resources:
- Navigate to
portal.azure.comand open the page for “Microsoft Entra ID”.
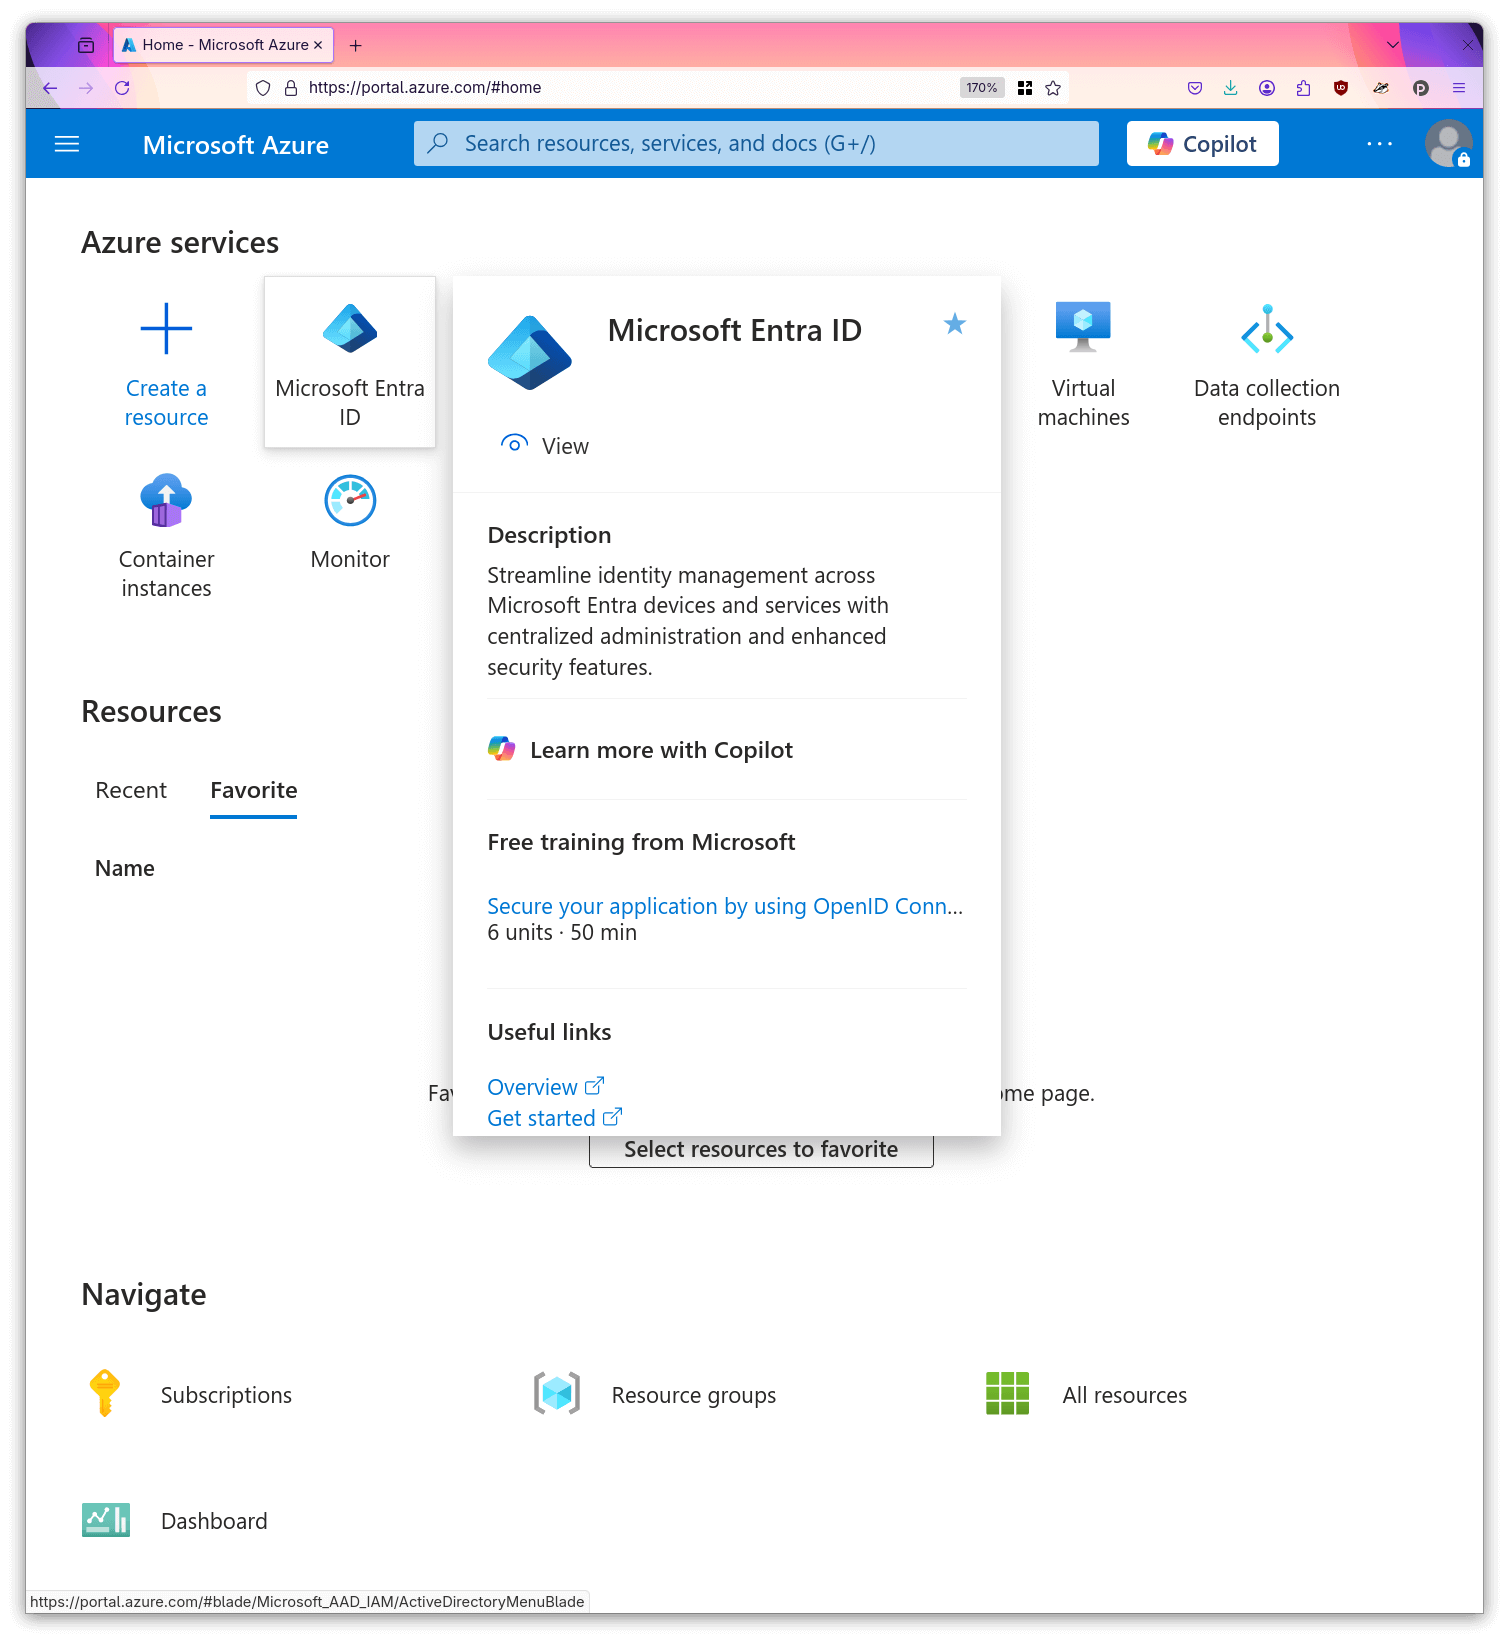
- Open the “App registrations” sub page.
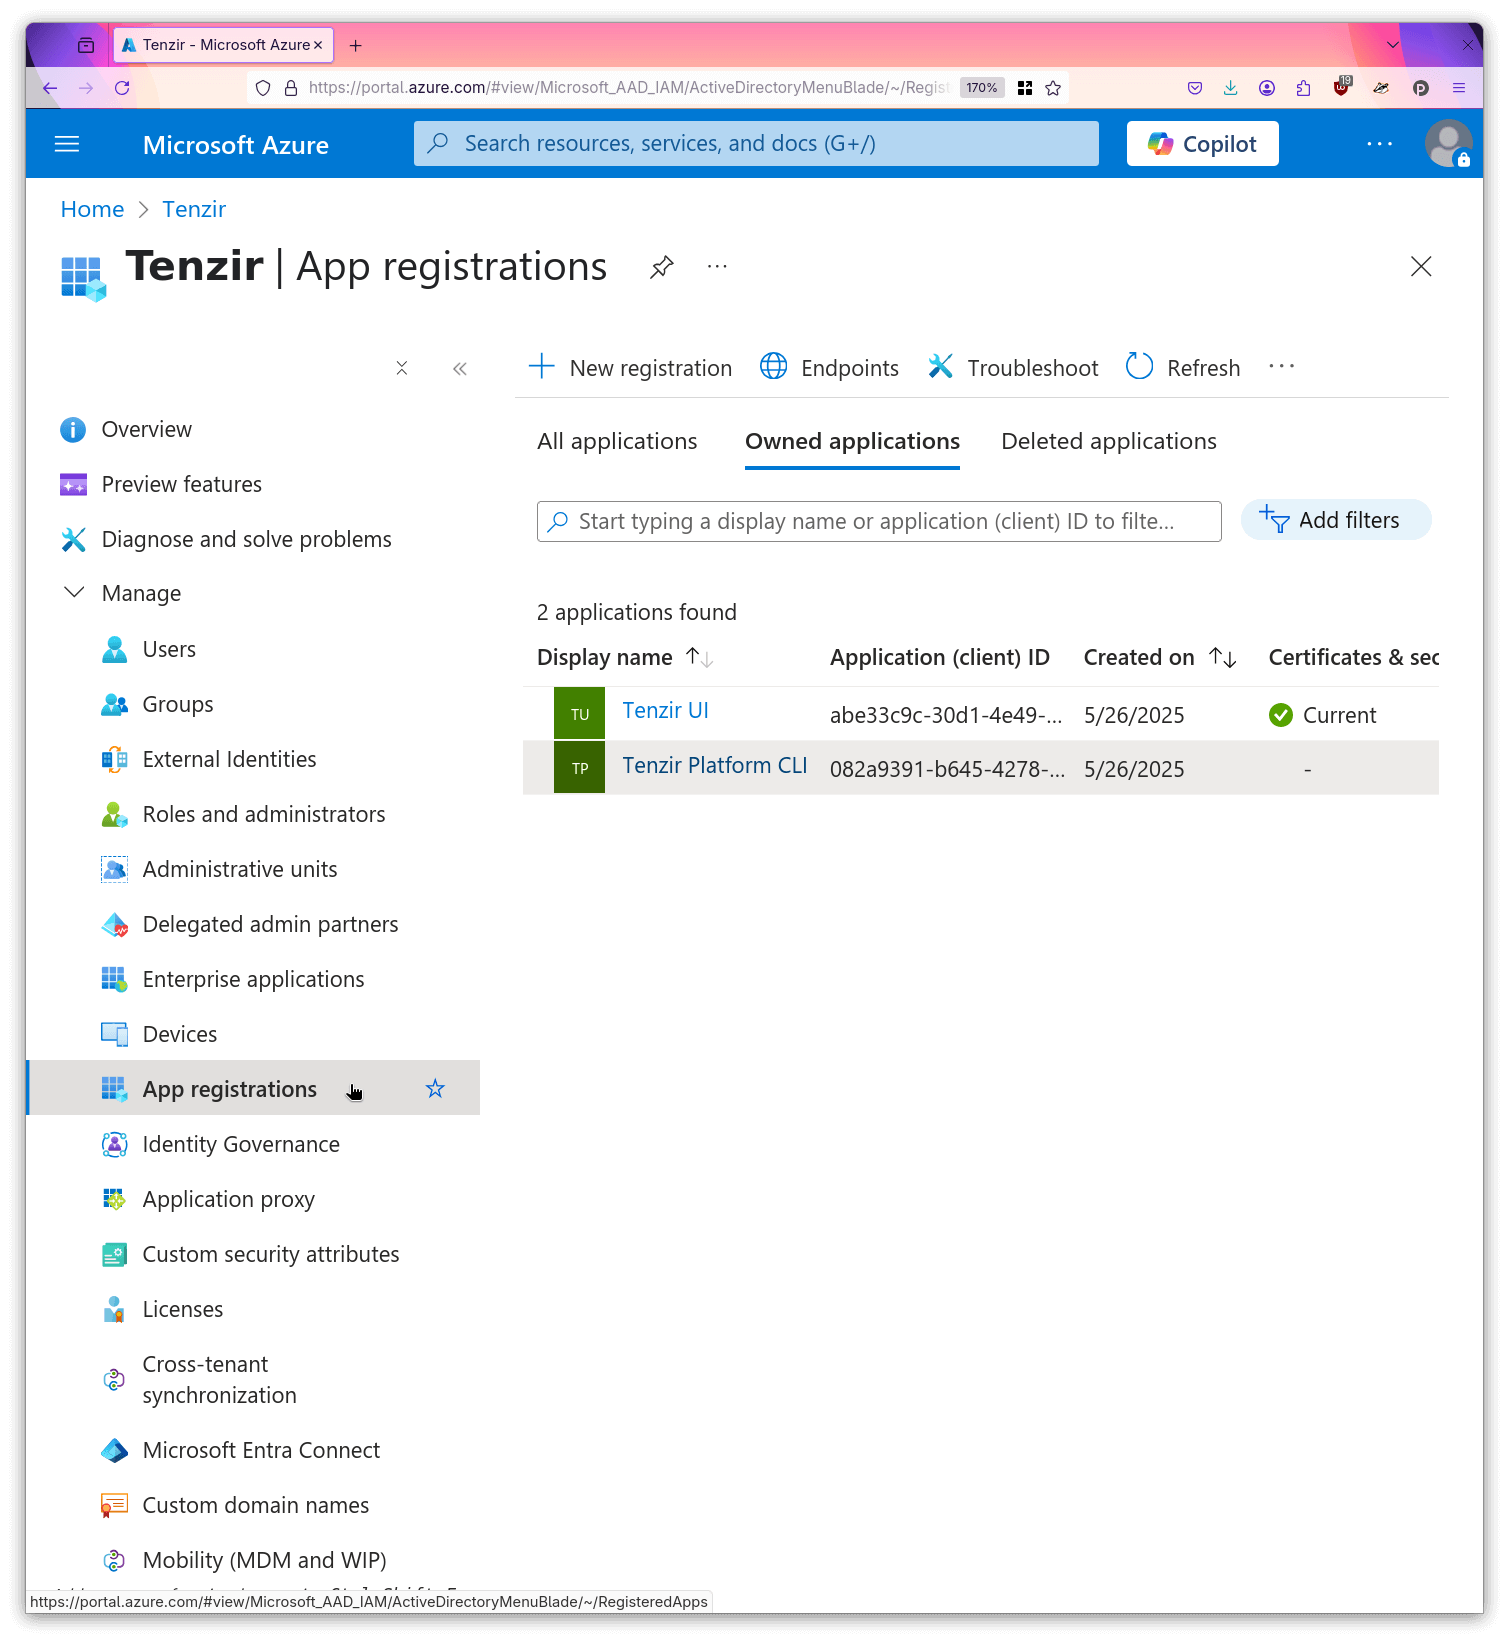
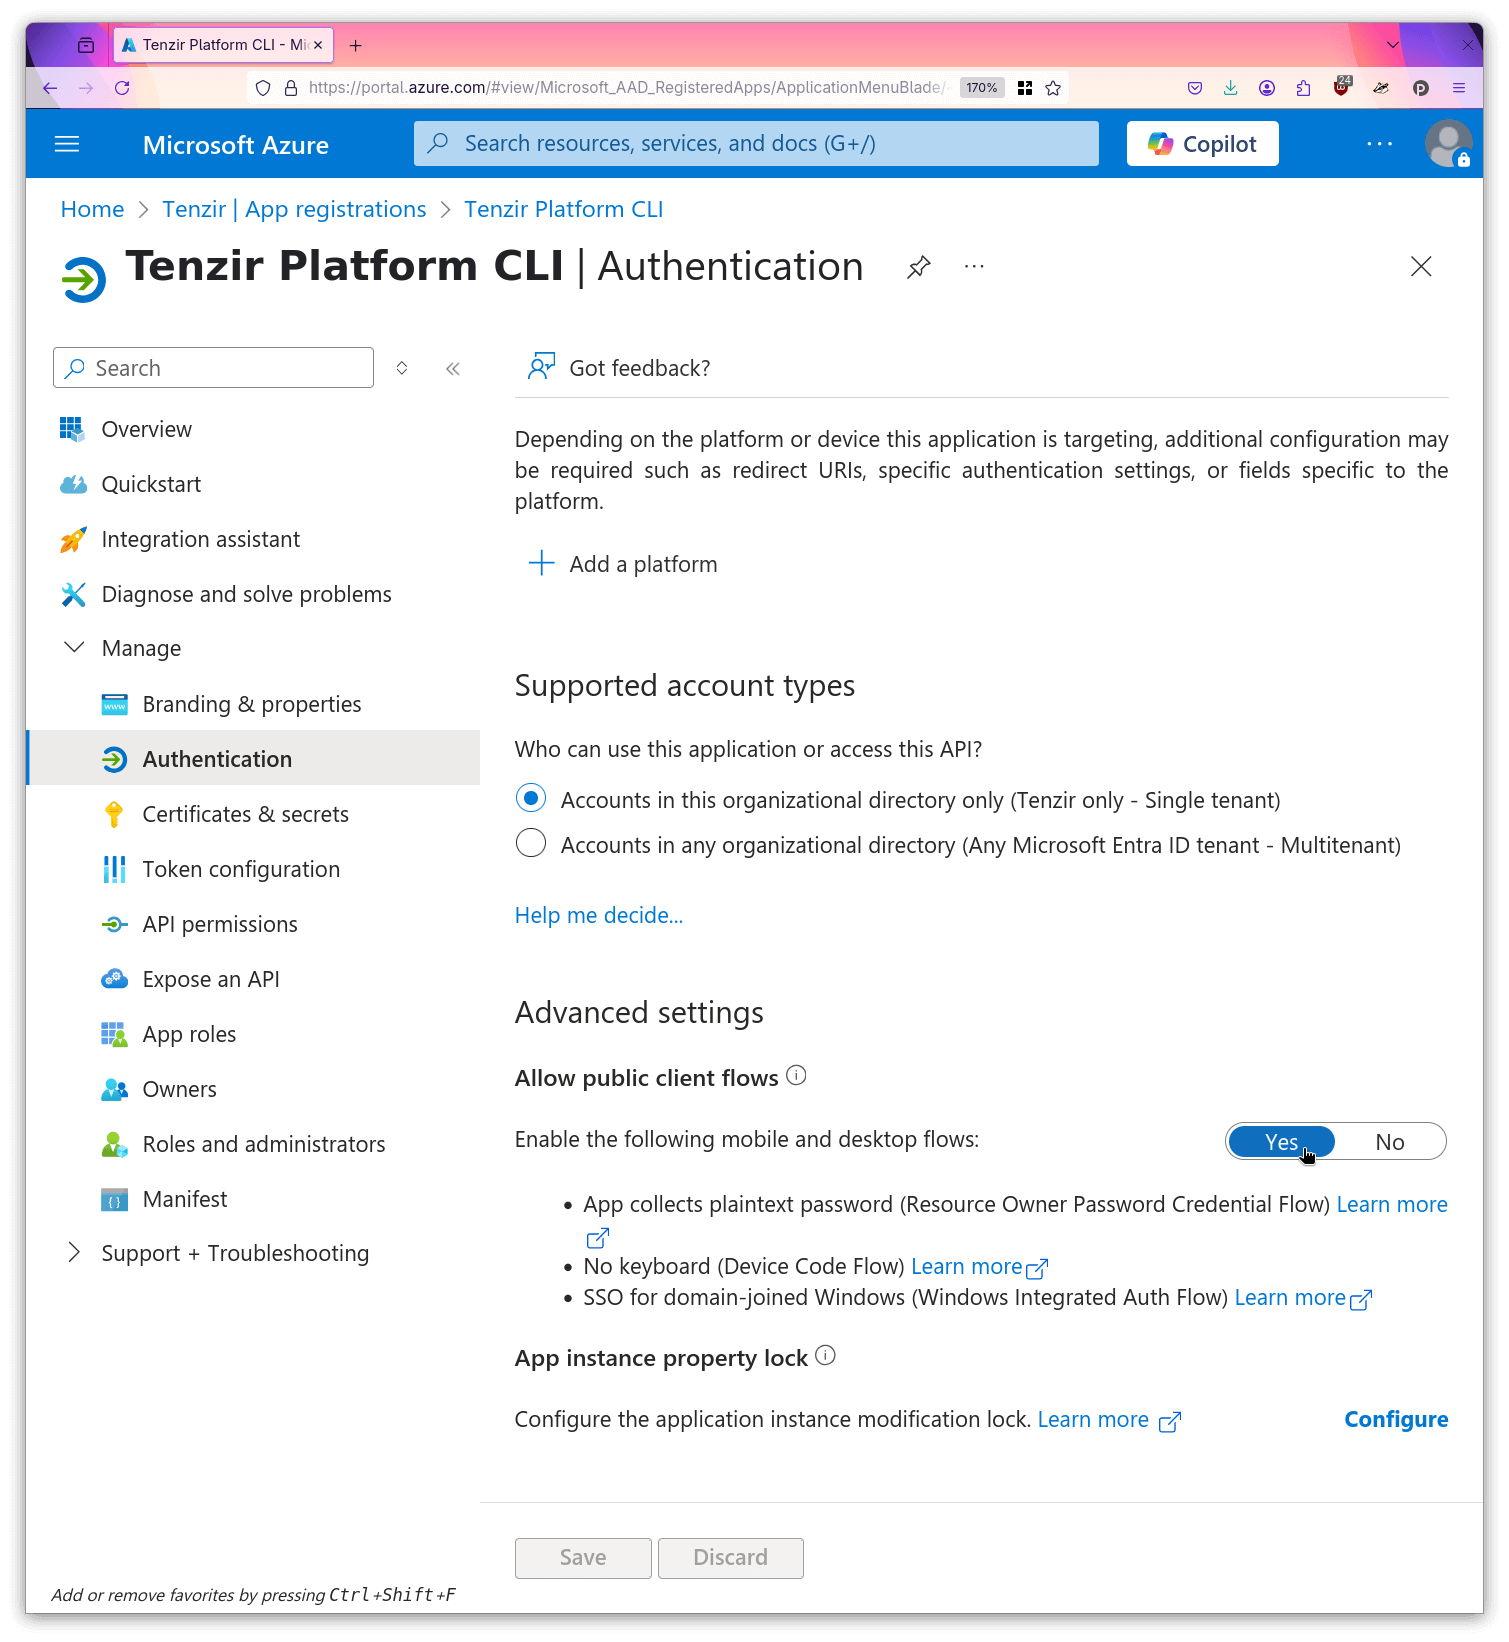
- Create a new registration named
Tenzir Platform CLI.
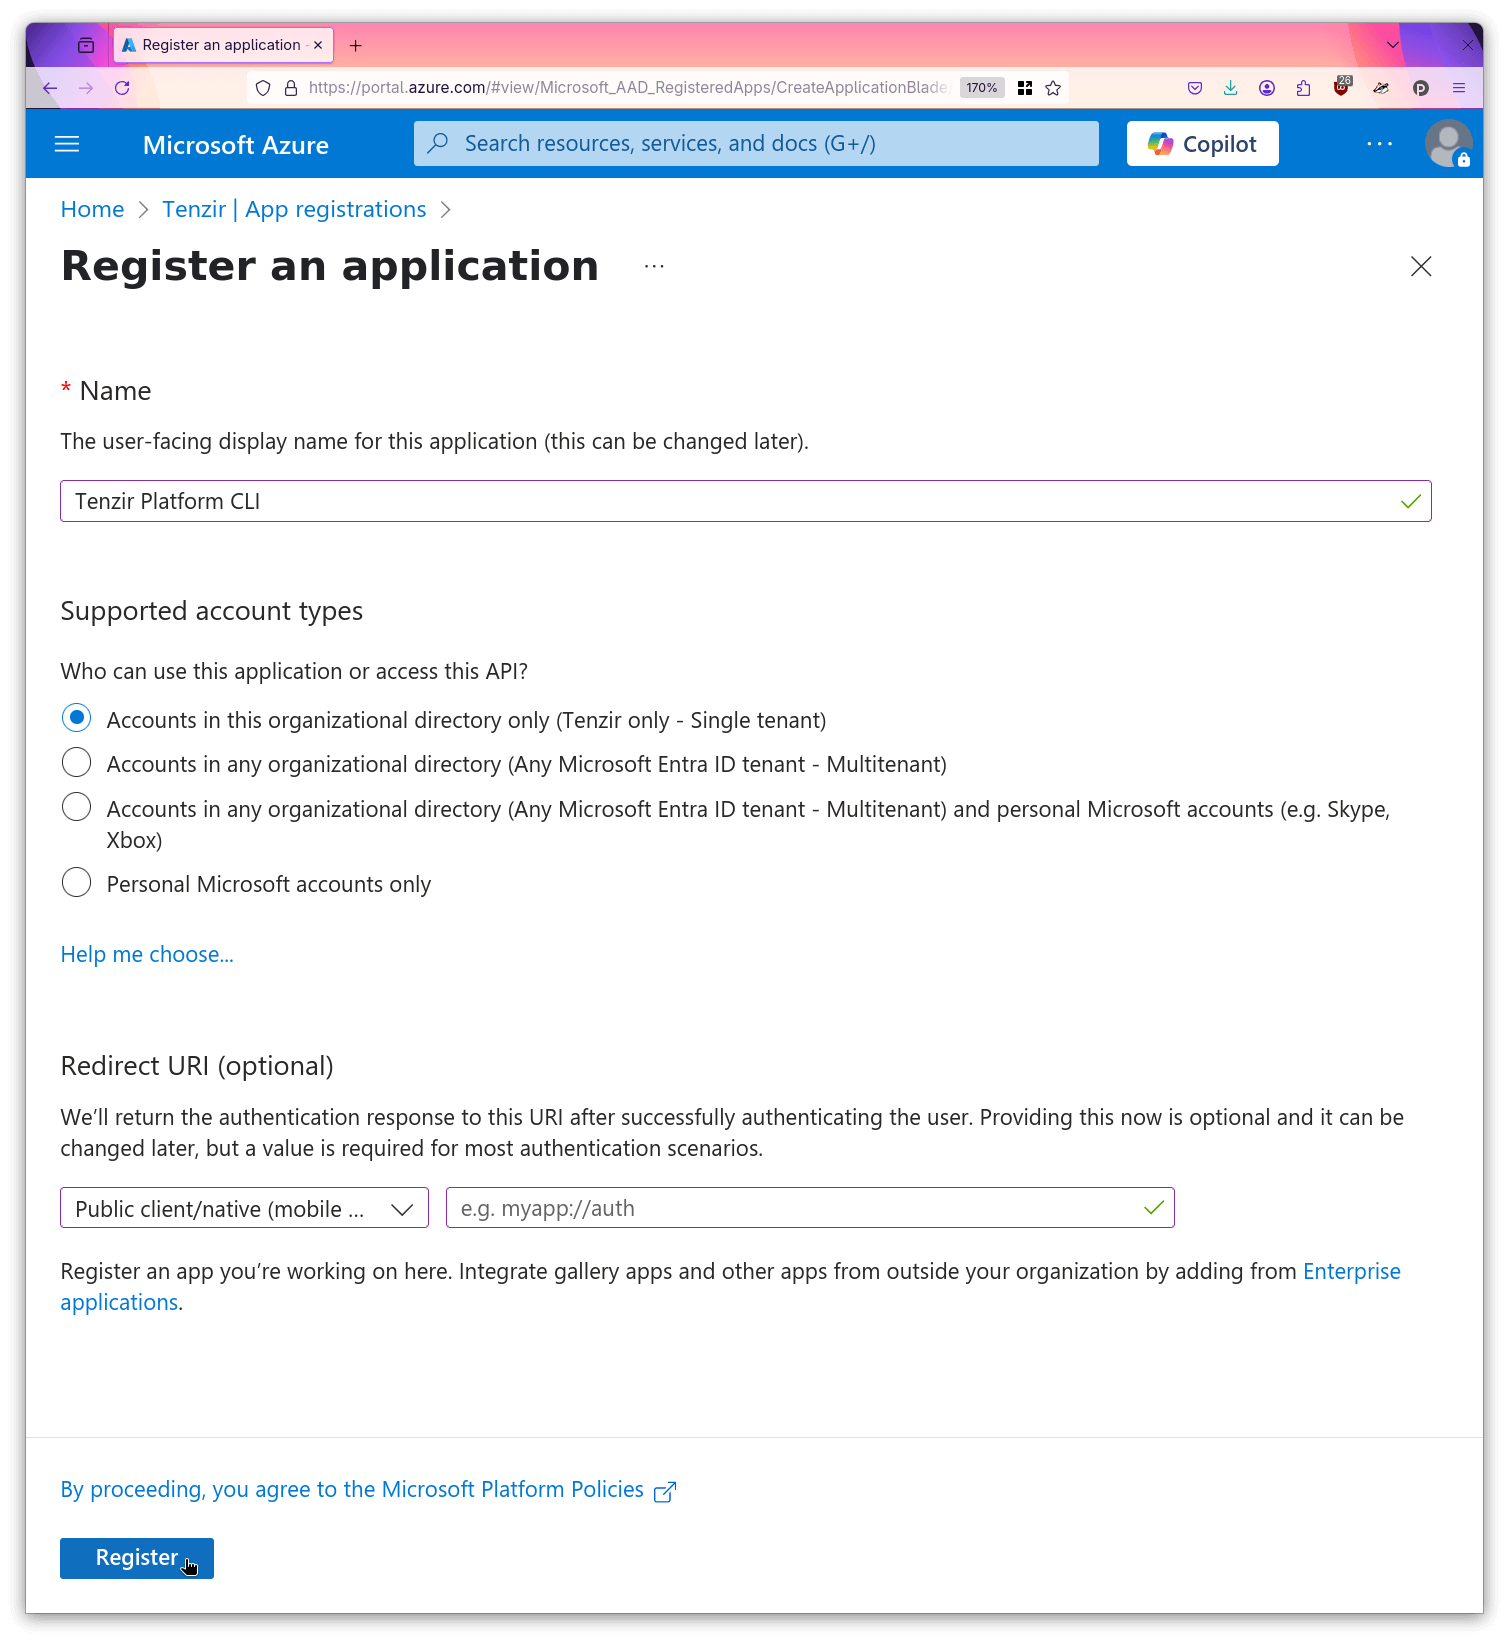
- Enable the public client flows for this app.
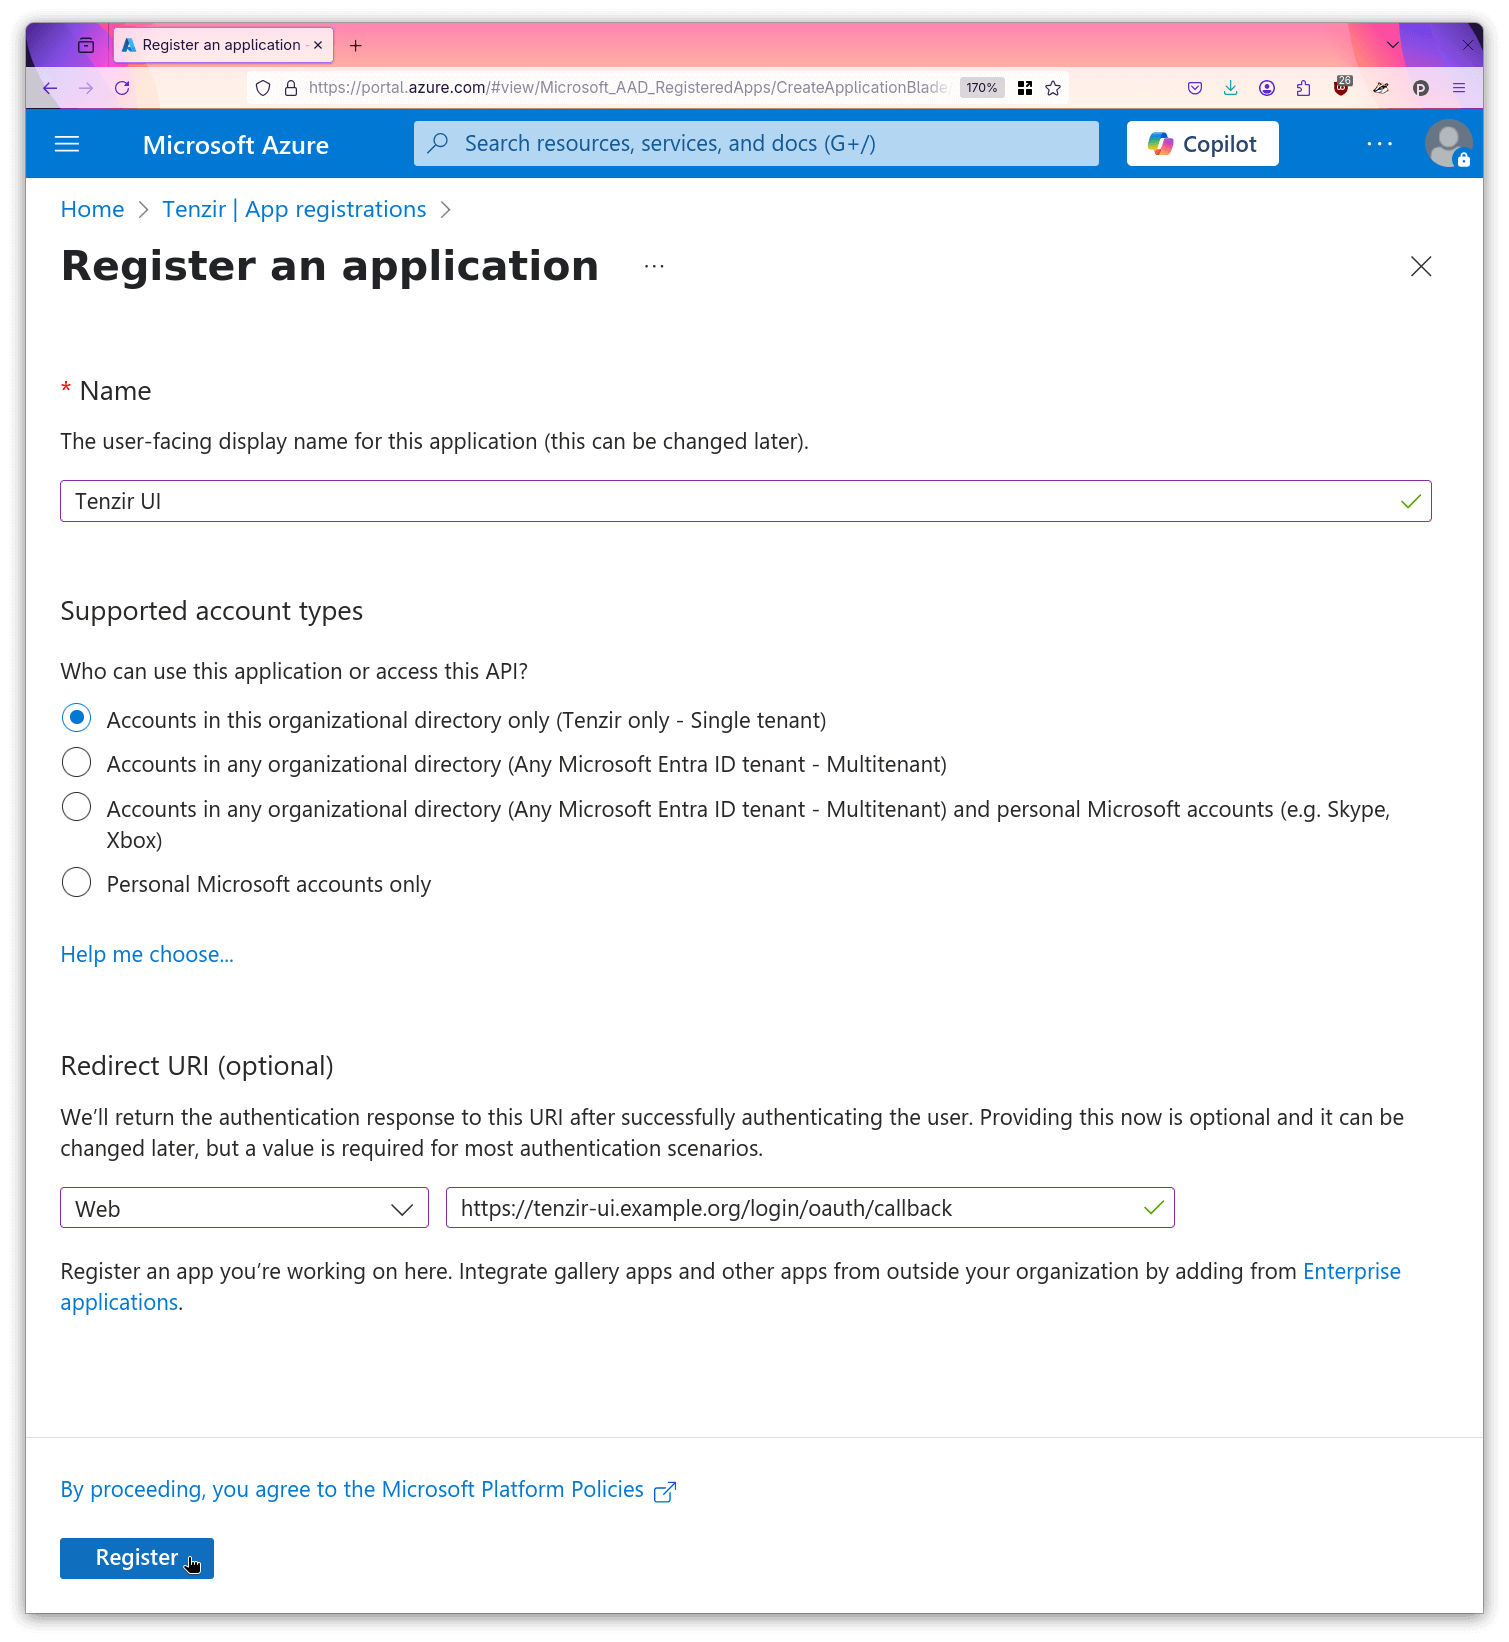
- Create a second registration named
Tenzir UI.
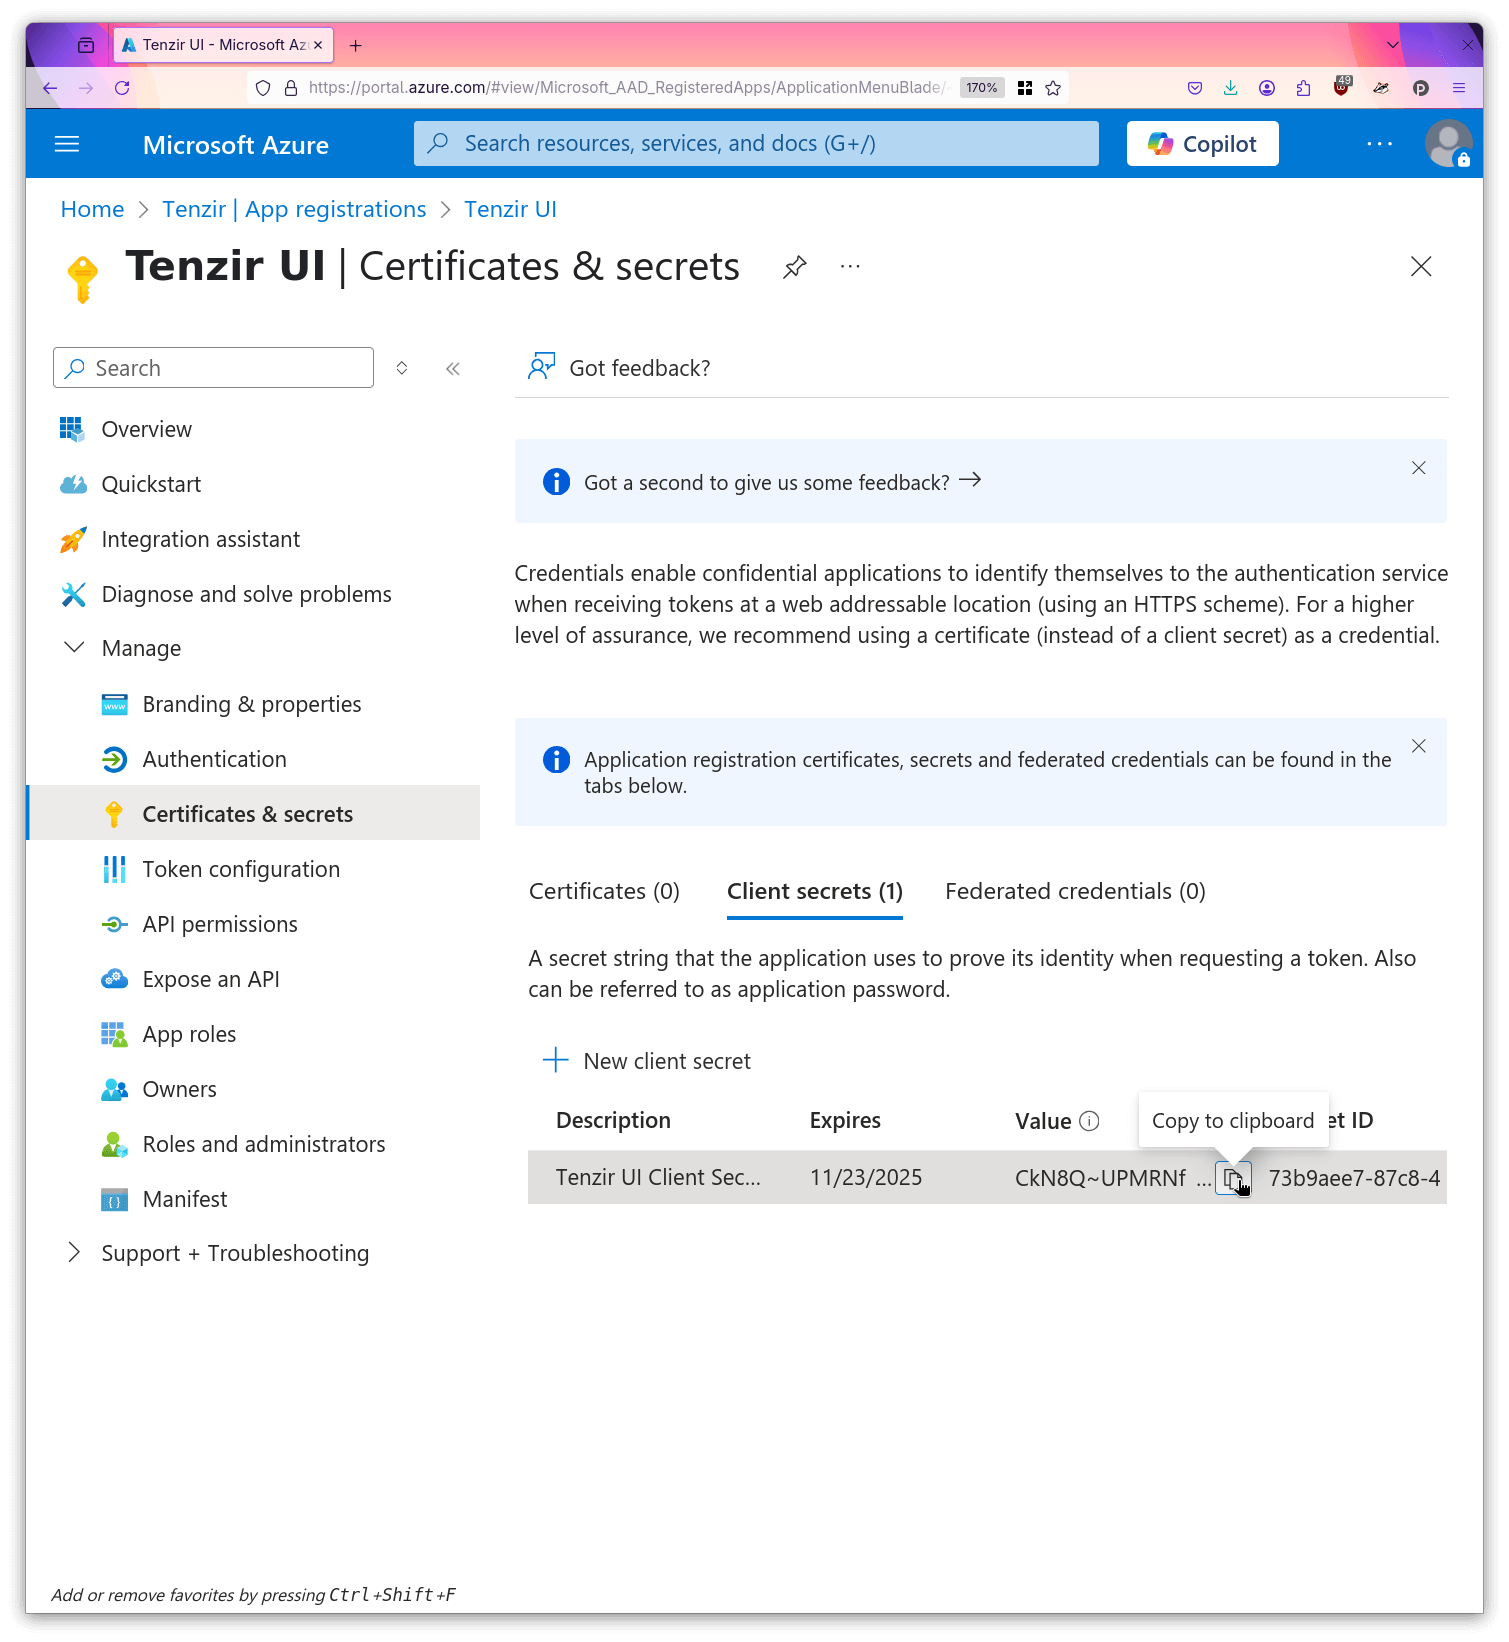
- For this registration, open “Certificates & Secrets”.
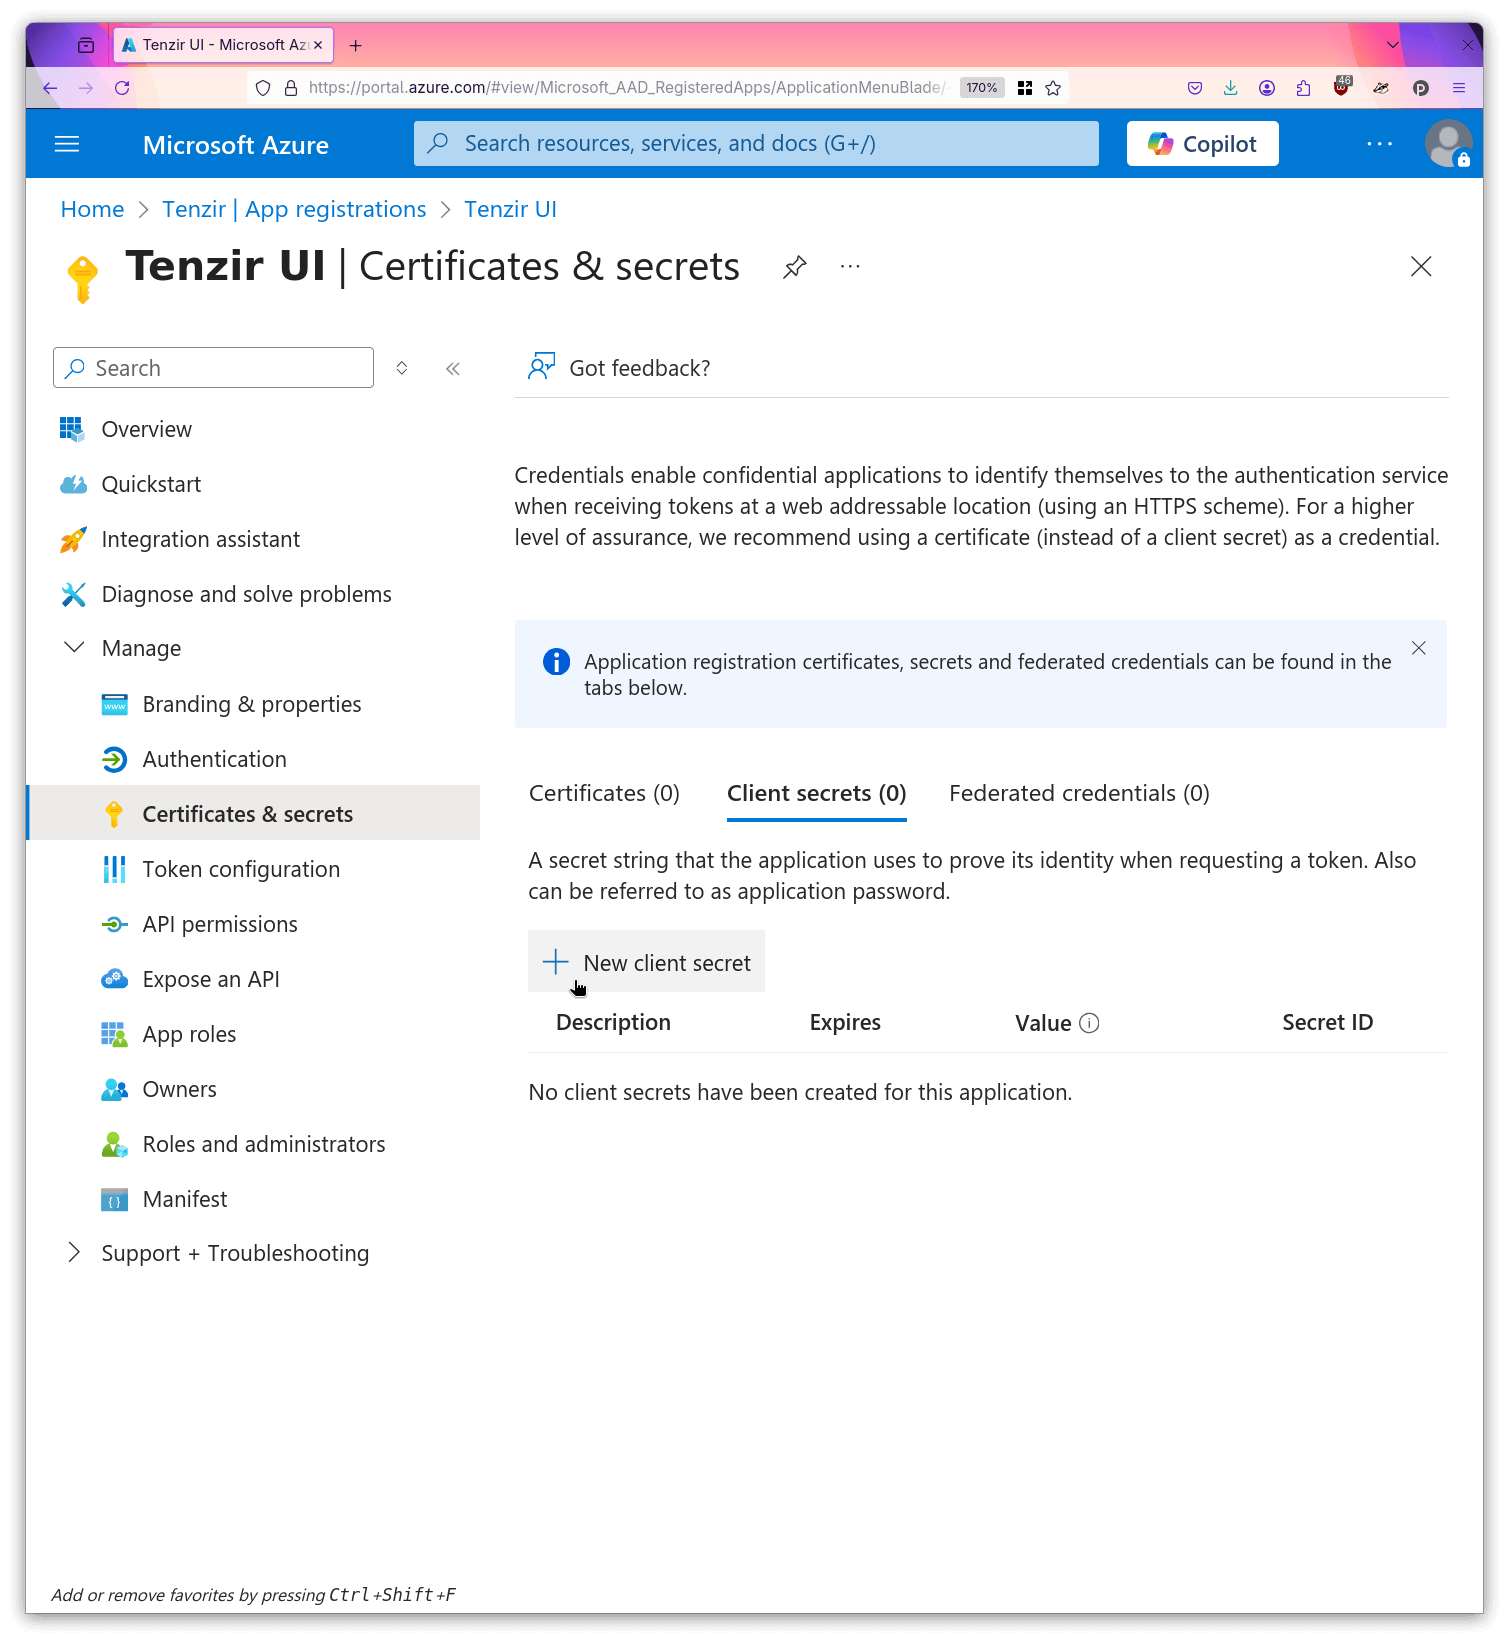
- Create a new secret and give it a descriptive name.
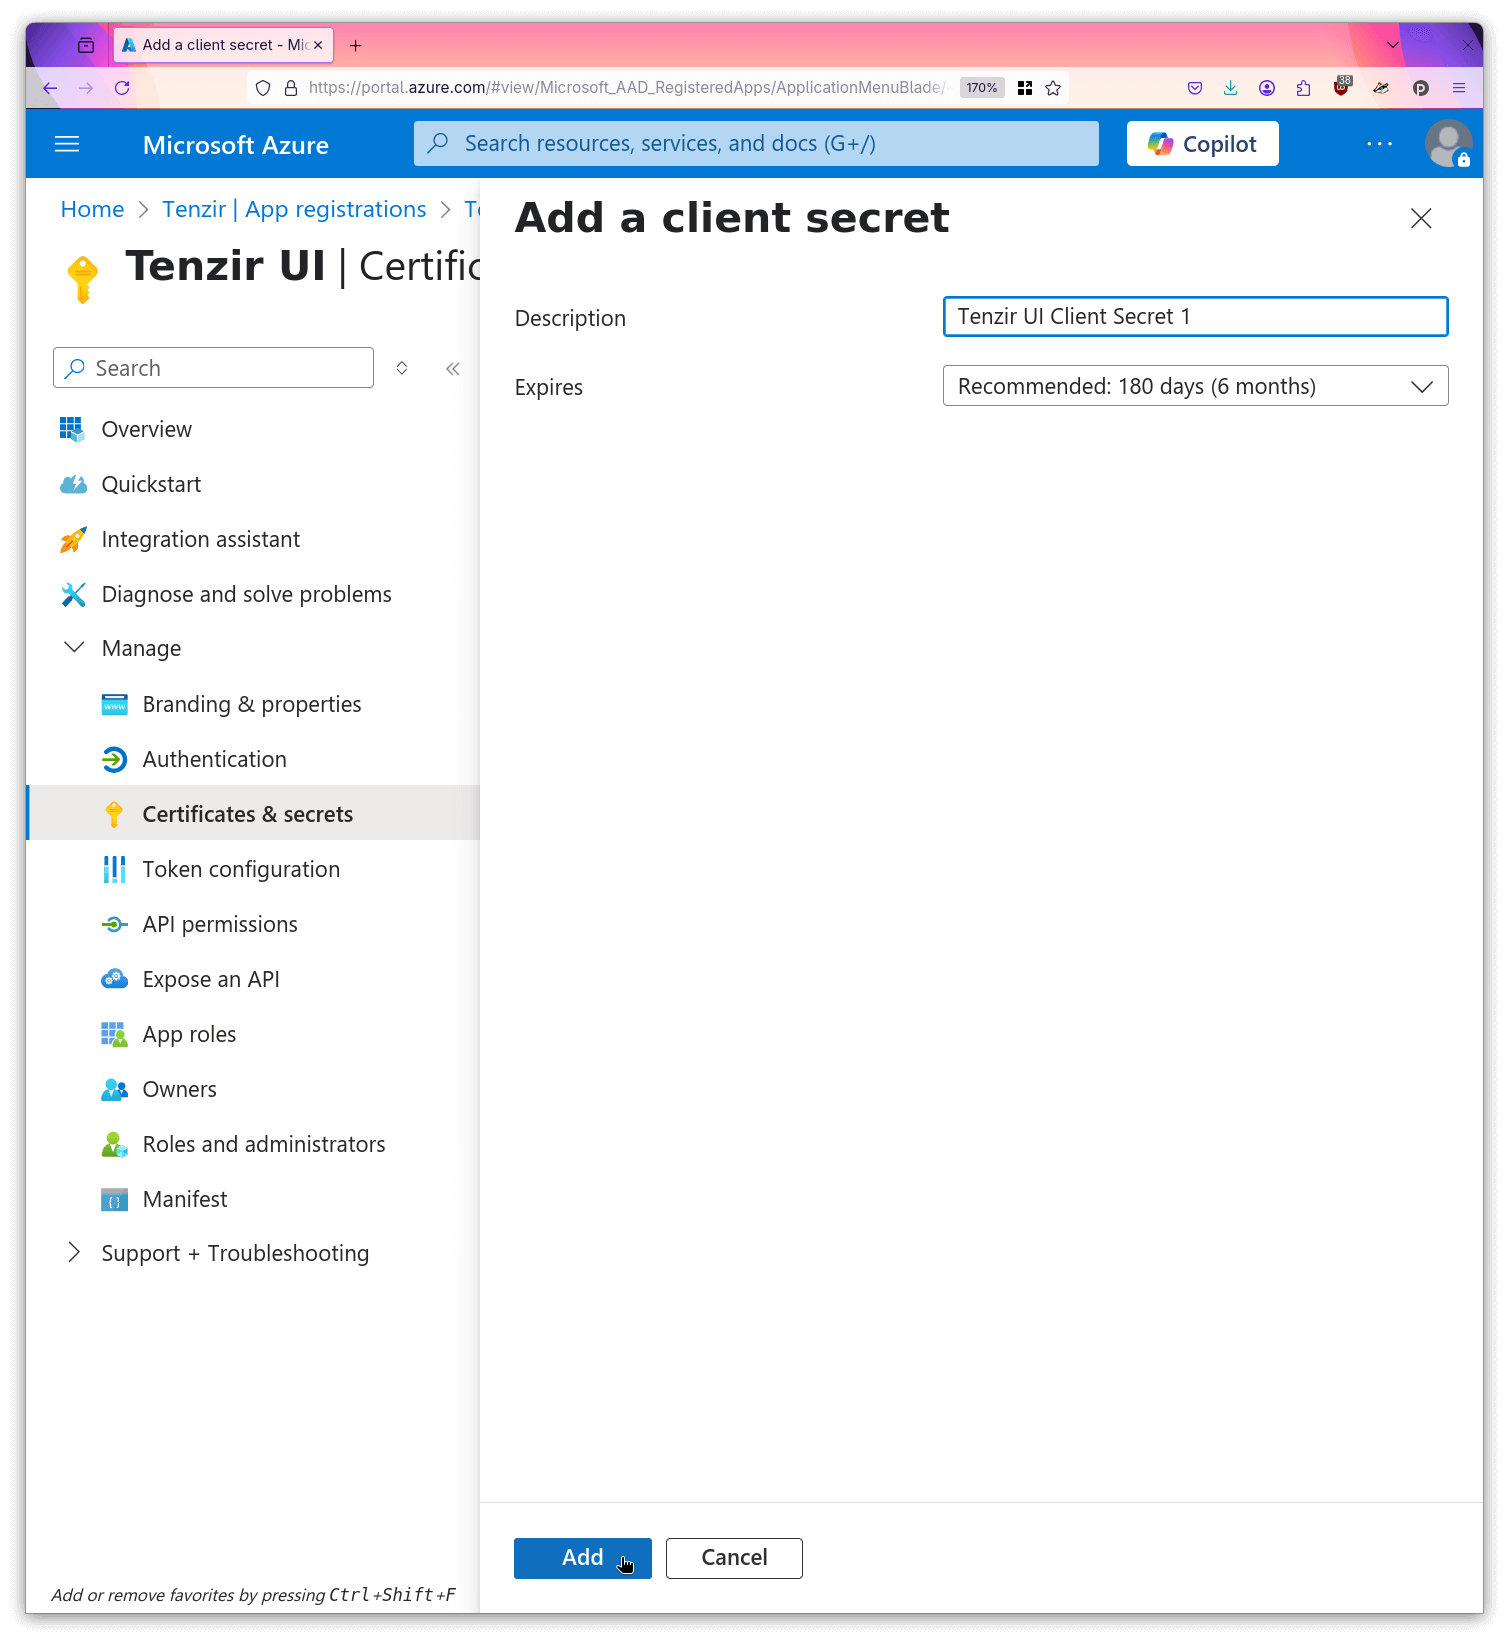
- Make a local copy of the secret value.
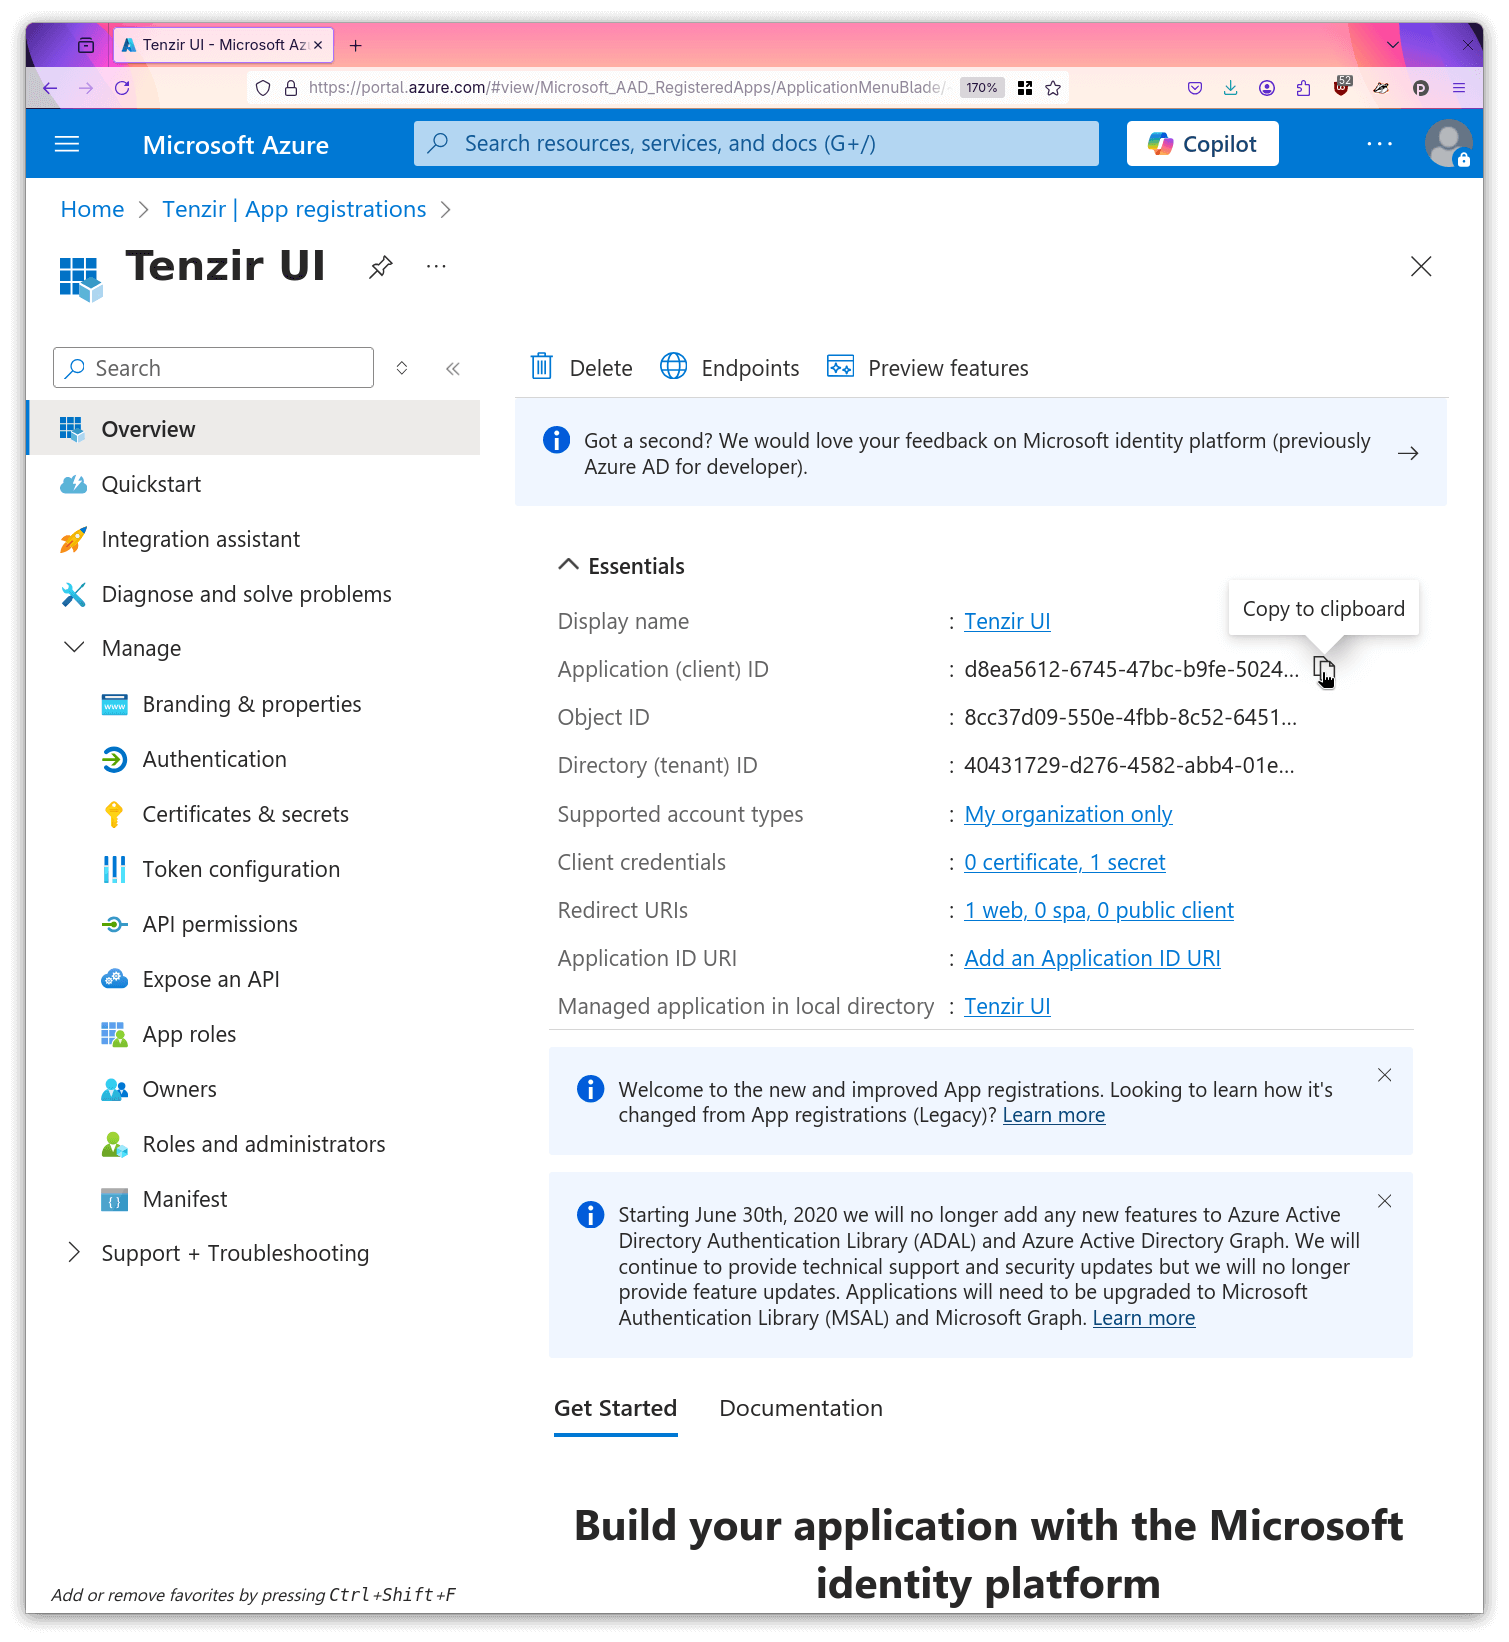
- Copy the client id to your local machine.
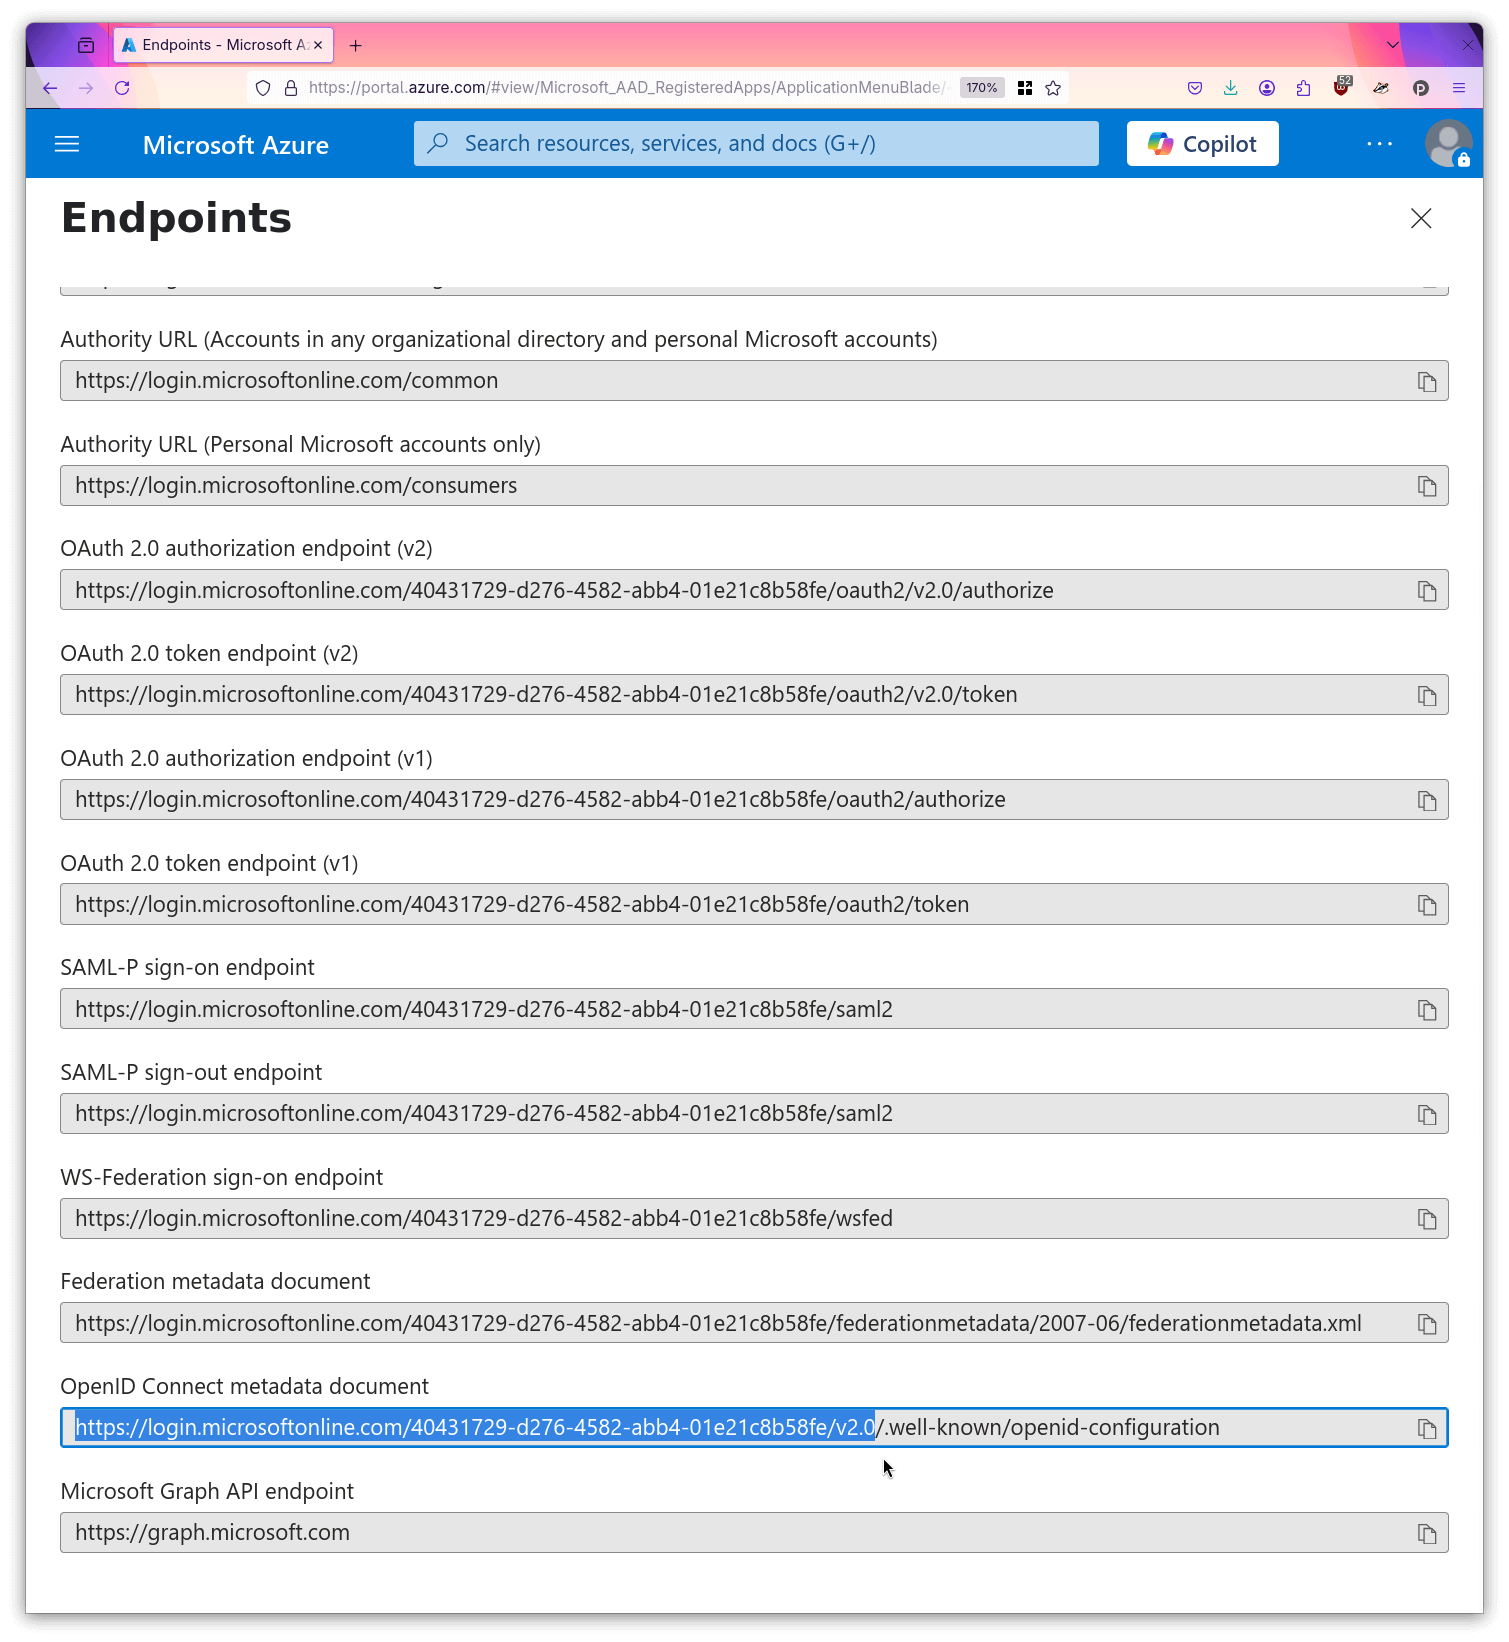
- Copy the issuer url to your local machine.
Now you can supply the created resources and values to the stack by editing
the .env file in your Compose folder:
TENZIR_PLATFORM_OIDC_PROVIDER_NAME="Entra ID"
# The client id of the registration created in step 3.TENZIR_PLATFORM_OIDC_CLI_CLIENT_ID=082a9391-b645-4278-a16e-3cf54fb1bcf0
# The client id and secret created in steps 8 and 9.TENZIR_PLATFORM_OIDC_APP_CLIENT_SECRET=xxxxxxxxxxxxxxxxxxxxxxxxxxxxxxxxxxxxxxxxTENZIR_PLATFORM_OIDC_APP_CLIENT_ID=d8ea5612-6745-47bc-b9fe-5024b1ca18fe
# The issuer url copied in step 10.TENZIR_PLATFORM_OIDC_PROVIDER_ISSUER_URL=https://login.microsoftonline.com/40431729-d276-4582-abb4-01e21c8b58fe/v2.0TENZIR_PLATFORM_OIDC_TRUSTED_AUDIENCES='{"issuer": "https://login.microsoftonline.com/40431729-d276-4582-abb4-01e21c8b58fe/v2.0","audiences": ["d8ea5612-6745-47bc-b9fe-5024b1ca18fe", "082a9391-b645-4278-a16e-3cf54fb1bcf0"]}'
Now you can restart your Tenzir Platform stack and the system will redirect you to a Microsoft login page when you next log in to the Tenzir UI.
Additional Configuration for Client Credentials Flow (Optional)
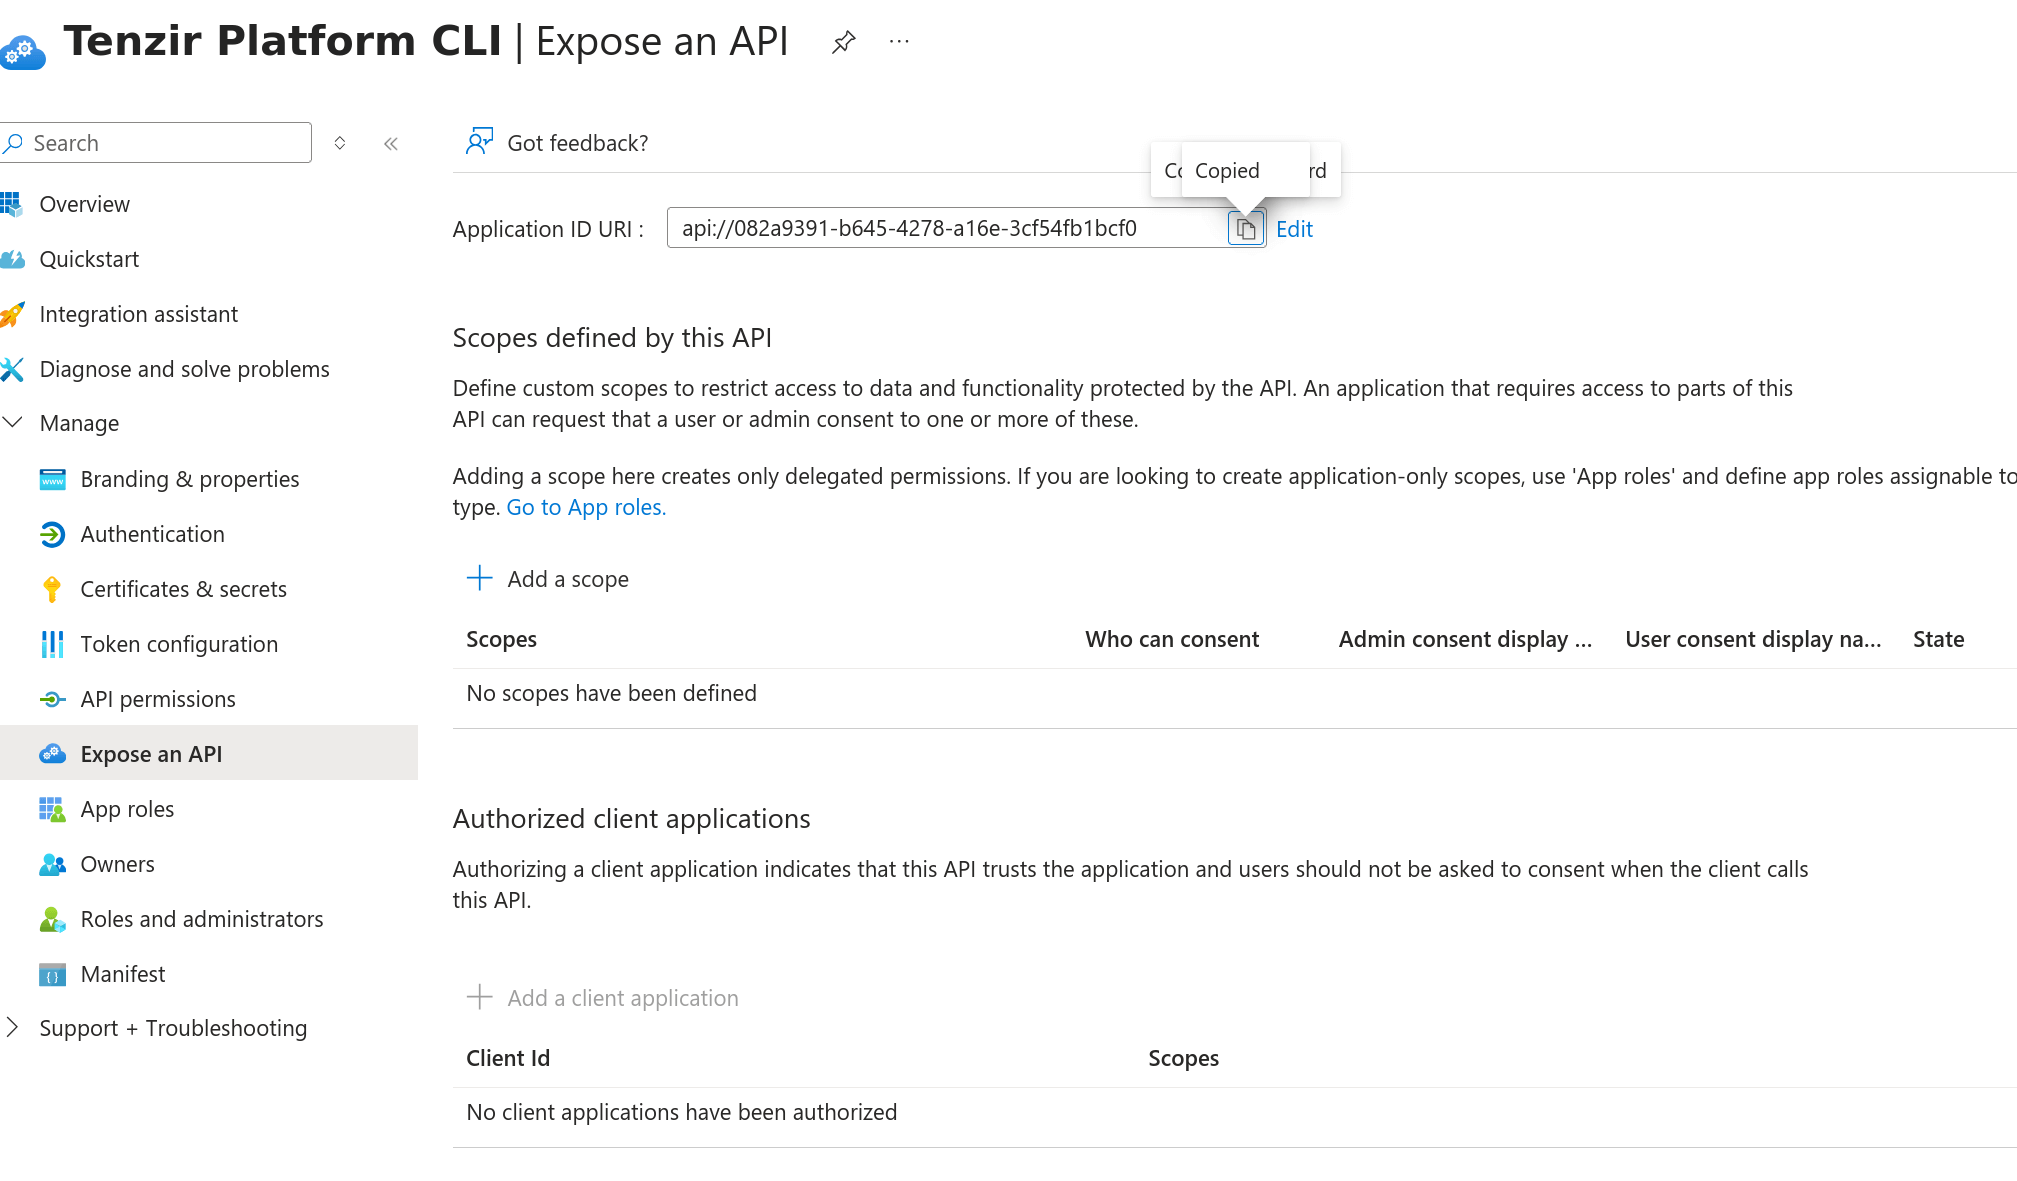
Section titled “Additional Configuration for Client Credentials Flow (Optional)”If you plan to use the client credentials flow for non-interactive CLI usage, you need to configure additional settings for the CLI registration created in step 3:
- Navigate to “Expose an API” and add an Application ID URI (you can use the suggested default value).
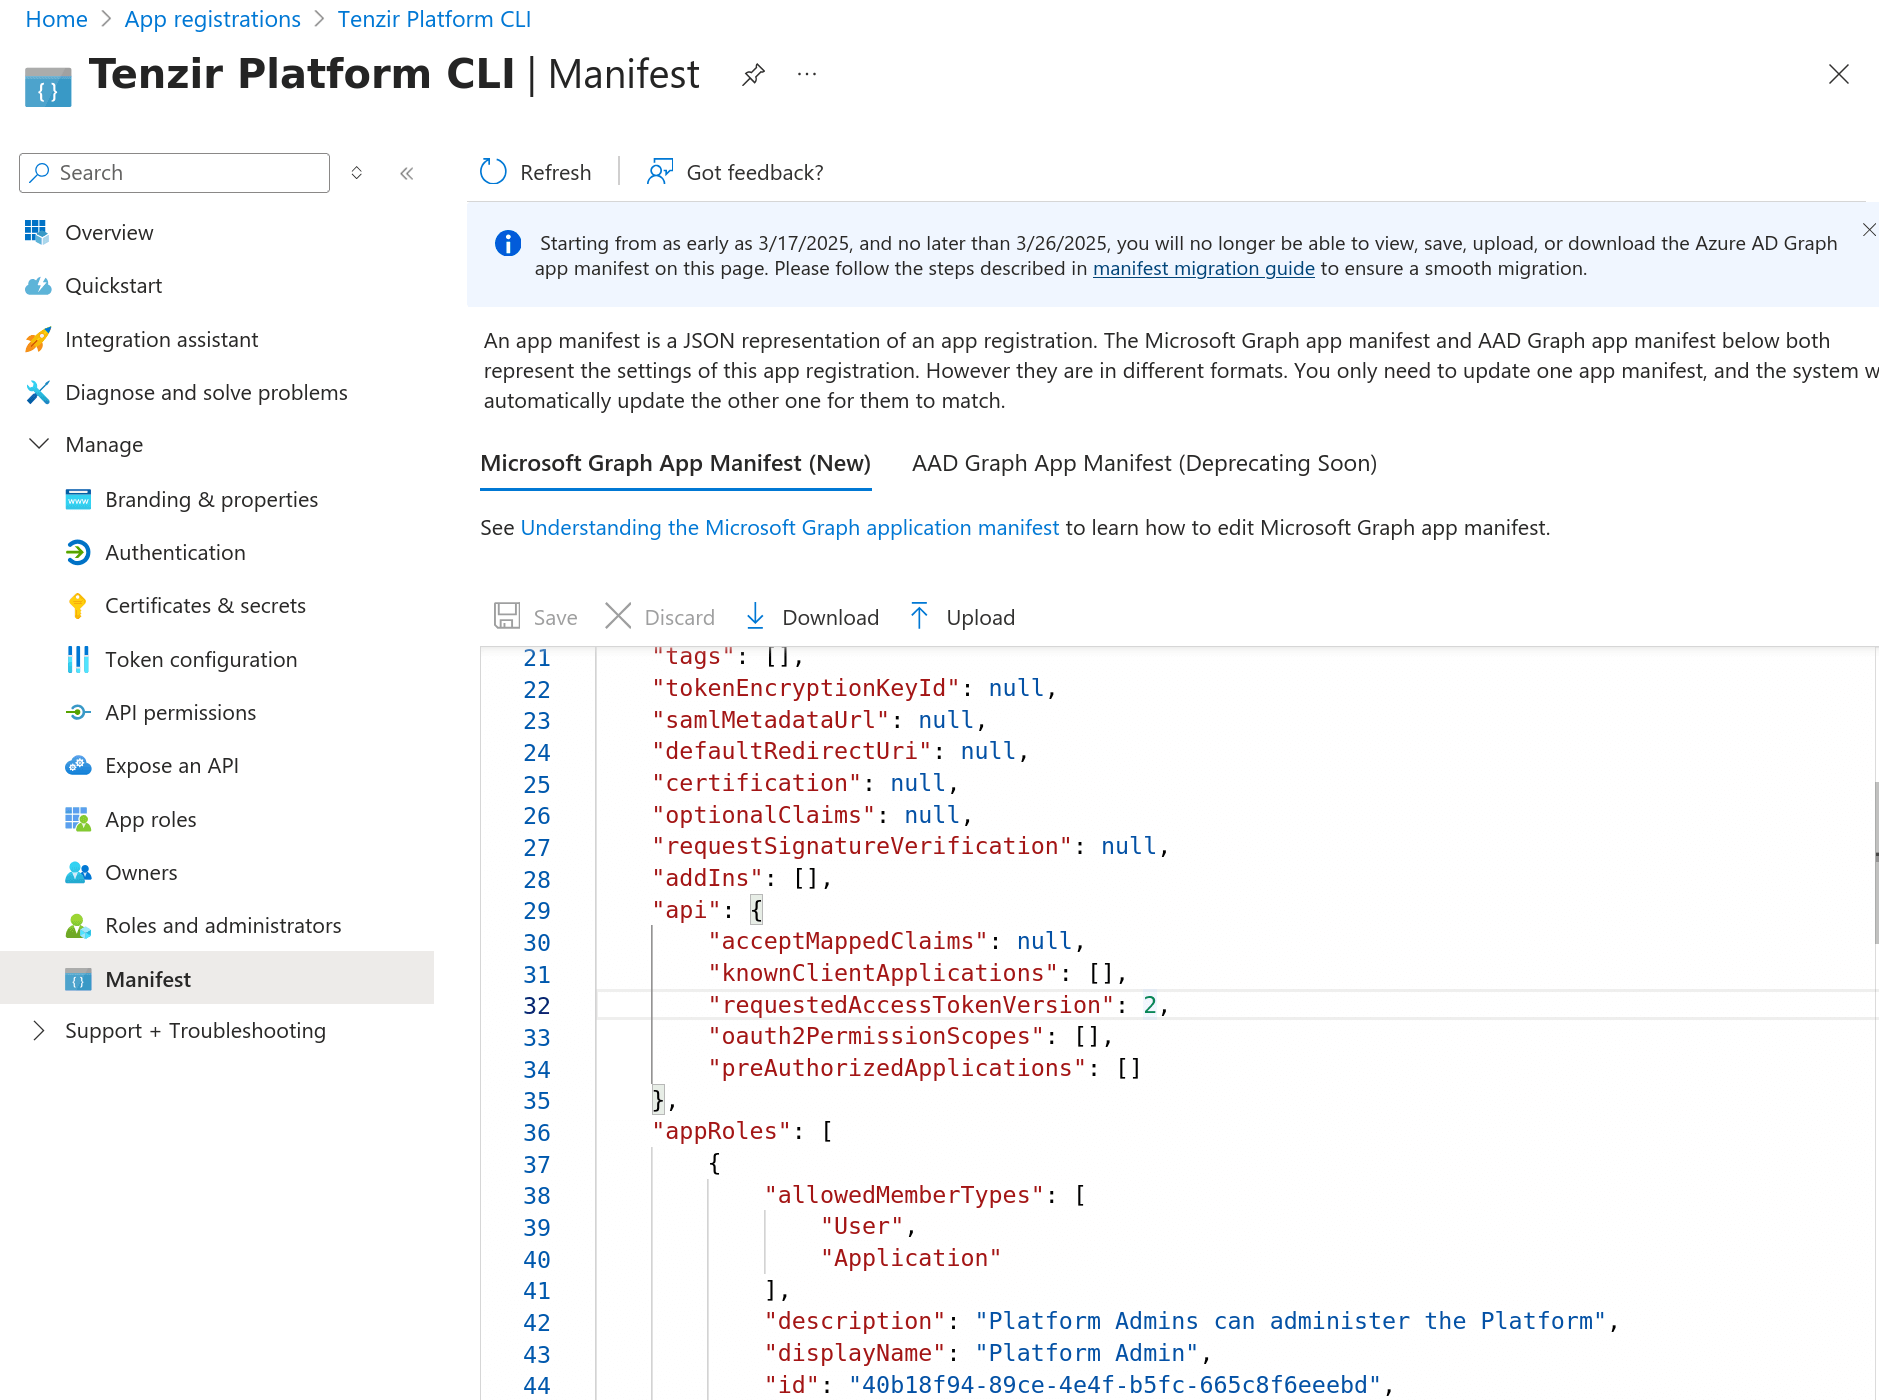
- Navigate to “Manifest” and update the
requestedAccessTokenVersionto2in the JSON manifest, then save the changes.
- When using the client credentials flow with this registration, you must override the scope by setting
TENZIR_PLATFORM_CLI_SCOPEto${APPLICATION_ID_URL}/.default, where${APPLICATION_ID_URL}is the Application ID URI you configured in step 11.
Single-user Mode
Section titled “Single-user Mode”In some scenarios handling multiple users is not necessary for the Tenzir Platform. For example for purely local instances used for development or experimentation, or where access is already gated through some external mechanism.
For these situations, the Tenzir Platform offers the single-user mode. In this mode, the Tenzir Platform itself acts as the identity provider, and creates a static, global admin user with no password.
To stress, this means that everyone who can reach the Tenzir Platform will have full access to every Tenzir Node and every workspace, so this is not suitable for generic production deployments.
To use the single-user mode, we recommend starting from this example setup. This example is already fully configured and can run as-is, skipping the manual configuration described in the sections below.
Tenzir Platform API
Section titled “Tenzir Platform API”In terms of configuration, the platform service needs to be put into
single-user mode by setting the TENANT_MANAGER_AUTH__SINGLE_USER_MODE
environment variable to true.
Additionally, the platform needs to have additional configuration that would usually be configured in the external identity provider, in particular the issuer url it should use for signing its own JWTs and the allowed redirect URLs and audiences of the UI and CLI:
TENANT_MANAGER_AUTH__SINGLE_USER_MODE=true
TENANT_MANAGER_AUTH__ISSUER_URL=http://platform:5000/oidcTENANT_MANAGER_AUTH__PUBLIC_BASE_URL=${TENZIR_PLATFORM_API_ENDPOINT}/oidcTENANT_MANAGER_AUTH__APP_AUDIENCE=tenzir-appTENANT_MANAGER_AUTH__APP_REDIRECT_URLS=${TENZIR_PLATFORM_UI_ENDPOINT}/login/oauth/callbackTENANT_MANAGER_AUTH__CLI_AUDIENCE=tenzir-cli
Tenzir UI
Section titled “Tenzir UI”The Tenzir UI needs to be pointed to the platform service as the new identity
provider.
Since the single-user mode does not provide true user authentication, the corresponding client secret is also not truly secret but set to the static string “xxxx”.
PRIVATE_OIDC_PROVIDER_NAME=tenzirPRIVATE_OIDC_PROVIDER_CLIENT_ID=tenzir-appPRIVATE_OIDC_PROVIDER_CLIENT_SECRET=xxxxPRIVATE_OIDC_PROVIDER_ISSUER_URL=http://platform:5000/oidcTenzir Platform CLI
Section titled “Tenzir Platform CLI”In single-user mode, the Tenzir Platform CLI can be set to non-interactive
mode by adding the TENZIR_PLATFORM_CLI_CLIENT_SECRET environment variable.
Note that when running the Tenzir Platform inside a docker compose stack, in single-user mode the CLI must run the same docker compose stack as the platform. When running outside of docker compose, the requirement is that the CLI must be able to establish a network connection to the configured ISSUER_URL.
TENZIR_PLATFORM_CLI_CLIENT_ID=tenzir-cliTENZIR_PLATFORM_CLI_CLIENT_SECRET=xxxxTENZIR_PLATFORM_CLI_ISSUER_URL=http://platform:5000/oidcAdvanced Topics
Section titled “Advanced Topics”Custom Scopes
Section titled “Custom Scopes”By default, the Tenzir Platform requests the profile email openid offline_access scopes
when you log in. To adjust this, set the PUBLIC_OIDC_SCOPES environment variable
to a space-separated list of scope names.
Profile Pictures
Section titled “Profile Pictures”To include custom profile pictures, include a picture claim in the returned
ID token that contains a URL to the image file.
The Tenzir Platform reads that claim and uses it as the profile picture in the top right corner of the user interface, or falls back to a default image if the claim isn’t present.
Refresh Tokens
Section titled “Refresh Tokens”The Tenzir Platform supports the use of refresh tokens and by default requests
the offline_access scope to automatically refresh sessions after the initial
ID token has expired. To this end, the offline_access scope is requested by
default.
Unfortunately, the OIDC spec is ambiguous on the precise semantics of
the offline_access scope, and Keycloak’s interpretation differs
from most other OIDC providers: it always includes refresh tokens by default,
and adds additional permissions to the token when the offline_access scope
is requested.
Therefore, some organizations forbid the use of tokens with offline_access
permissions for security reasons. In that case, add an environment variable
PUBLIC_OIDC_SCOPES=profile email oidc to the app environment to explicitly
remove the scope request. The bundled Docker Compose file in this directory does this
by default.
External JWT Authentication
Section titled “External JWT Authentication”The Tenzir Platform supports authentication using externally-supplied JWTs, which is useful for scenarios where the platform runs behind a proxy that handles authentication, such as Google Cloud IAP or other enterprise proxies.
To configure external JWT authentication, add the PRIVATE_JWT_FROM_HEADER
environment variable with the name of the HTTP header that contains the JWT token
to the environment of the Tenzir UI:
PRIVATE_JWT_FROM_HEADER=X-Goog-IAP-JWT-AssertionYou must also configure the trusted issuers and audiences using the
TENZIR_PLATFORM_OIDC_TRUSTED_AUDIENCES environment variable. This variable
accepts a JSON object or array of objects containing the issuer and audiences
that the platform should accept:
# Single issuer configurationTENZIR_PLATFORM_OIDC_TRUSTED_AUDIENCES='{"issuer": "https://cloud.google.com/iap", "audiences": ["your-audience"]}'
# Multiple issuers configurationTENZIR_PLATFORM_OIDC_TRUSTED_AUDIENCES='[  {"issuer": "https://accounts.google.com", "audiences": ["audience1"]},  {"issuer": "https://cloud.google.com/iap", "audiences": ["audience2"]}]'